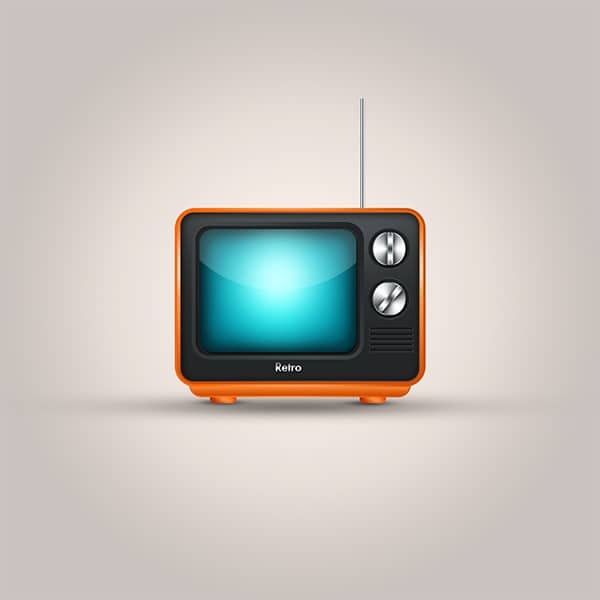
In this tutorial, I will show you how to create a cute detailed vintage television icon from scratch using Photoshop. The detailed step by step guide will help you to understand the process of its creation. So let’s begin!
Tutorial Details
- Program: Adobe Photoshop CS6
- Estimated Completion Time: 45 minutes
- Difficulty: Beginner-Intermediate
Step 1
Open a new file (File > New) in Adobe Photoshop with the following settings.

Step 2
Fill background with white color #FFFFFF, then then apply following layer styles.

Step 3
Use the Rounded rectangle tool (U) with Radius = 35px to create a rectangle with any color you want. Name this layer as BODY and open Layer Style properties , then apply following layer styles.

Apply Stroke to BODY layer.

And you get result like this image below.

Step 4
Use the Rounded rectangle tool (U) with Radius = 35px to create a rectangle with any color you want. Name this layer as BODY_2 and then apply following layer styles.

Apply Stroke to BODY_2 layer.

Apply Inner Shadow to BODY_2 layer.

You should get result like this:

Step 5
Create a new layer and place it under BODY layer. Name this layer as BASE. Use the Rounded rectangle tool (U) with Radius = 35px to create a rounded rectangle then apply following layer styles like this image below.

Go back to BODY layer and press right click to Copy Layer Styles then Paste Layer Style to BASE layer. Now we need to fix the Stroke size = 3px in BASE layer.

Here is the result.

Step 6
Create a new layer and place it under BASE layer. Name this layer as FOOT. Use the Rounded rectangle tool (U) with Radius = 35px to create a rounded rectangle then apply following layer styles. 
Apply Inner Shadow to FOOT layer.

You should get result like this:

Now we duplicate the FOOT layer and place the copy like this image below.

Step 7
We create a new layer and we name it as GLOSSY, place it on the top of layers. Then grab Brush Tool (B), and with large soft brush dub one white spot.

We apply the Blending Mode to Overlay with lower Opacity = 50%.

Step 8
We create a new layer and name it as SCREEN , place it on the top of layers. Use the Rounded rectangle tool (U) with Radius = 35px to create a rounded rectangle. Then we go back to BODY_2 layer and right click to Copy Layer Style and Paste Layer Style to SCREEN layer. Now we need to fix the Stroke size = 10px in SCREEN layer.
31 responses to “Create a Cute Television Icon From Scratch”
-

LAOOO SINAV OLUUOZ LAAAAAAAAAAAN
-
great
-
i hate this stuff
-
…
-
Thanks so much, Really love it
-
Daddys House
-
SHEESH
-
-
nice and amazing step by step tutorial
-
please can use explain step 2 how to apply layer styles
“Fill background with white color #FFFFFF, then then apply following layer styles.”-
Fill your layer with white. Shift+Backspace to bring up the Fill window then select White and then click OK.
Right-click on the layer then click “Blending Options”. Checkmark Gradient Overlay then click on the word Gradient Overlay. Copy the settings in the screenshot.
-
-
swag
-
it is not challenging. all you use is the gradient tool
-
Thank you very much
-
How do you do the shadow?
-
Fantastic tutorial thank you – I am an AI user normally and learning to draw in PSD to get better effects, so this was just what I needed!
-
Thanks
-
Your welcome you trollol
-
-
Thank you very much
-
It’s good but the tutorial could use some work. Such as size of objects and the placement of the gradient sliders.
-
i want try it..can please more simplify it..?
-
no he can’t. this is way too easy. too simple to understand. don’t know how fools like you cant do it… gawsh
-
-
I’ve been working on this forever. And I still have nothing resembling a donut… Oh wait… Wrong tutorial… My bad… Or is it?
-
My brother took this tutorial. Incredibly difficult. Maybe some more clarification… Or fix your grammar…
-
I followed this and here is my result http://webmasterdiary.org/photoshop/photoshop-drawing-tutorial/
-
This was fantastic! Thank you so much for taking time to write all this. I can’t even begin to think how much time it took you. I followed the tutorial until the end and got a great result. I had some challenges with screen where there was this annoying light circle in the middle. I couldn’t figure out why it happened but eventually fixed it with the white dot that came over it. Because of this my screen came out slightly different but still looking great. I uploaded the result to my blog and gave link back to this page. I don’t know if it’s okay to leave my link here but I will try: http://webmasterdiary.org/photoshop/photoshop-drawing-tutorial/
-
my friend says to challenge myself. but what does he know, right? this is pretty challenging… mehbe… didn’t do it… ill do it now…
-
Lovely tutorial. I followed and finished it. Nicee
-
Photoshop is for photos. Illustrator is for illustrations\vectors.
-
Who are you the creator of Photoshop and leader of what Photoshop is for? no.
-
I personal prefer photoshop’s control for gradients and other digital effects. Especially for modern graphics. Or maybe I’m just more used to photoshop’s functions.
-
lol you, mister photoshop is for photos… some people like this kind of thing
-
Leave a Reply