This green was accomplished using the color # 174208, applied with the paint bucket* tool to the background layer.

*Set to full opacity
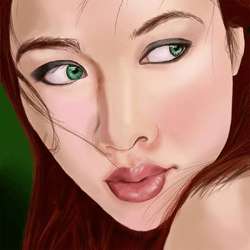
Step 5
With a brush* set on 400 pixels, splotch the background with black, but leave the majority the same green color as before. Then take the heal brush** and set the mode to multiply, and use it the blend the black out and into the green of the background. This will give a nice blended effect, without the plastic look you get with Gaussian blur.

*Brush set to full opacity
**Diameter 188 pixels, Hardness 100%, Spacing 25%
Step 6
Make a new layer and title it “Skin”. This layer will serve as the base for her skin tone. Take the paint brush* and block in the face area with color # E7B4B1. It is very important at this point, to have the face shape clocked in correctly, otherwise the entire portrait will be off.

*Set to full opacity, brush size 135 pixels, and pen pressure on.
Step 7
Now that you have the basic structure of the face, make a new layer titled “hair” and place it below the skin. Block in the hair with color # 3D0502 using the same brush used on the skin. Next, make a new layer above the skin layer and title it “eyes”. Use a base neutral grey to shade the eye area* (#C1B3B0).

*If you shade the whites of the eyes with white, they will appear alien and too bright. Because of this, we begin with a grey to tone it down.
Step 8
After outlining the eye and tear duct area with a small brush* in color # 984340, use the dodge tool** to highlight the whites of the eyes. Make sure not to make them too bright, or again the eyes will look unrealistic. Use the dodge tool again, this time set to 6% opacity to add depth to the tear duct.

*11 pixels, 65% opacity, 100% flow, hard edged round brush
**11% exposure, 15 pixels, soft edged brush, mode set to highlight
Step 9
Outline the iris and pupil (using same hard edged brush as before) with color # 0D0302.

Step 10
Shade in the eyes. For this step, I created a gradient from dark (top of eye) to light (center bottom of the iris) using colors # 061302, # 061302, and # 547131. After doing this, change the bush to soft edged brush at 45% opacity. Brush the lower half of the eye with color # 497D88, concentrating the color on the bottom fourth of the iris. Adding this blue will make the eyes a more complex shade, and will add more depth.
7 responses to “Create a Painting from a Portrait Photograph”
-

gr8 tutorials thanxxx
-
Please uninstall Photoshop and NEVER use it again.
-
@Dan Bolivar, Delete your browser, eat a happy pill and go climb a tree. Troll.
-
-
Thank you for tutorials.
-
can i make this without using graphic tablet
-
Can I use Photoshop 6 to make this…if not, why??
-
nice tut thanks for sharing
Leave a Reply