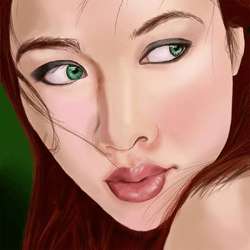

Step 11
Now take the same dodge tool as before set this time to 5 pixels (change to shadow mode), and add the highlights to the eye. The more complex the highlights, the more realistic the eye will be. Try to avoid the manga-style big white highlight in the corner of the pupil, as it will make the eye look flat. If you wish to add more detail, take the green used to outline the iris set to 45% opacity, and make little lines in the eye, much like short, curved, and transparent tiger stripes. Be careful not to make them overpowering though.

Step 12
Use the paint brush* and color # 1E2207 to outline the eyes. The model has liner her waterline, but a little of the pink will still show above the darker line.

*10 pixels, 75% opacity, hard edge, (use a lighter hand towards the inner corner of the eye)
Step 13
Use the same brush and color as before to indicate the upper eyelid.

Step 14
Shade the upper eyelid with color # 586452. First block in the solid color, then take the dodge tool* and highlight the inner corner of the eye, the area right above her liner, and then out towards the outer corner. Take the burn tool** and add shadows to the area right below the line made to indicate the crease in the eye, the outer corner wing, and right on the liner in the inner and outer corners of the eye.
To get the sparkle effect, go to FilteràNoiseàAdd Noise. Adjust the amount until satisfied with the amount of sparkle on the eyelid (make sure the distribution is set to uniform). Don’t add so much noise that it appears grainy.

*21 pixels, 11% opacity, soft round brush, shadows mode
**34 pixels, 32% opacity, soft round brush, midtones mode
Step 15
Underline the eye with the same grey color as before, and use the smudge brush* to soften the line.

*25 pixels, 75% strength, soft round brush, normal mode
Step 16
Draw the upper eyelashes using the same color and brush used for the liner*. The point here is to create the impression of eyelashes, not to paint each individual one. This can be done in long tapered sweeps with the base thickest, and the end tapering off to a soft point.
7 responses to “Create a Painting from a Portrait Photograph”
-

gr8 tutorials thanxxx
-
Please uninstall Photoshop and NEVER use it again.
-
@Dan Bolivar, Delete your browser, eat a happy pill and go climb a tree. Troll.
-
-
Thank you for tutorials.
-
can i make this without using graphic tablet
-
Can I use Photoshop 6 to make this…if not, why??
-
nice tut thanks for sharing
Leave a Reply