Next, block in the midtones* and lights** using the same brush.
As you can see, I often turn the outline layer on and off, depending on what I am working on at the moment. Here, I wanted a little more guide as to where the nose is situate and the same in relation to the mouth, so I have turned it on. When the layer is turned on and where it is located at any given time (in relation to the other layers, above or below) is entirely up to you.

Step 22
Now brush* color #F0CCA1 over the entire layer. Layer the color up where there are the highlights of the face, such as on above the eyebrows, under the eyes, and above the mouth area. I have also taken the liberty of taking a transparent red (color #EA9382) and dusting** it lightly across the right cheek, mid forehead and chin. I used a lighter color pink on the left cheek (color #E7B4B1). This second cheek color is the base skin color we started out with, by using it again; it will help create unity within the work.
I have also begun some basic definition on the nostrils. This can be done using short strokes and a 10 pixel brush at 45% opacity (hard edged brush) and color #753D1D.

*72 pixels, 53% opacity, soft edged brush
**350 pixels, 25% opacity, soft edged brush (this will take some layering on the cheeks and chin, try to leave the forehead to one layer)
Step 23
Now define* the darkest darks with color #753D1D.

*27 pixels, 11% opacity (layering!!), hard edged brush
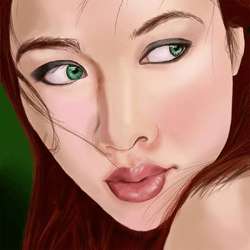
Step 24
Finish sculpting the nose and face.
For the nose, take an 85 pixel brush at 8% opacity, and layer on the darks (color #B27556). The darkest area will be around the left eye. Don’t forget the area underneath the nostrils, or the dark in the nostrils themselves. But something to note is that the darkness in the nostrils is NOT the darkest dark of the nose. This will avoid the gaping hole look that many portraits get when the nostrils are shaded to darkly.
Now time for the face.
What this will comprise of is lighting up the area above the right eyebrow, above the mouth area, and below the eyes with the dodge tool*. Next take color #B5836B and a 180 pixel brush (6% opacity, soft edge) and darken the temple area above the right eye.
7 responses to “Create a Painting from a Portrait Photograph”
-

gr8 tutorials thanxxx
-
Please uninstall Photoshop and NEVER use it again.
-
@Dan Bolivar, Delete your browser, eat a happy pill and go climb a tree. Troll.
-
-
Thank you for tutorials.
-
can i make this without using graphic tablet
-
Can I use Photoshop 6 to make this…if not, why??
-
nice tut thanks for sharing
Leave a Reply