And now, the lips are done!

*Use a 60 pixel soft brush (but use a soft hand, this will make the line very thin, but will give you more control) at 7% opacity
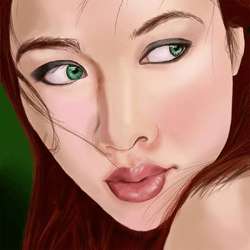
Step 34
So moving on to the hair, actually create a new layer above the hair layer and title it “hair highlights”. Just like the title says, we are going to begin by highlighting the hair.
This is both the simplest, and most time consuming part of the creation process, but when done right will make every portrait look very realistic.
Start with the area just above the shoulder. This is where most of the hair detailing will come in, just as it does in the photograph. Using long thin strokes make the impression of hair cascading over her shoulder. Remember, hair does not start halfway down the shoulder, it starts outside the frame. Because of this, every strand must begin at the outside and make its way over the shoulder. Make some of the strands shorter, tapering off the ends. Make sure that there is still some of the background color showing through the strands while you work.
Use the same process to indicate the highlights throughout the rest of the hair.
To define the hairline use short strokes that taper on both ends.
Use the hair to set the hair into the hairline a little by adding a short fringe in front, and hair crossing over it and into the background.

Step 35
The last step for rending the hair is adding the darks (color # 150201). This can be done using a large soft edged brush set to 70% opacity, and then using a 4 pixel brush for details around the shoulder and hairline.
Once the hair looks finished, use a hard edged opaque eraser brush and fix up the lines, cleaning up the edges around the face.

Step 36
And, you’re done! You can chose to take it further, adding detail to the shoulder* and adding wisps of hair in the face or not. How far you go is entirely up to you!

*Colors for shoulder details
Lights- ECC7B6
Darks- CB9C81
The most important thing to remember about the shoulder is to leave a little bit of the pink skin base showing through.
7 responses to “Create a Painting from a Portrait Photograph”
-

gr8 tutorials thanxxx
-
Please uninstall Photoshop and NEVER use it again.
-
@Dan Bolivar, Delete your browser, eat a happy pill and go climb a tree. Troll.
-
-
Thank you for tutorials.
-
can i make this without using graphic tablet
-
Can I use Photoshop 6 to make this…if not, why??
-
nice tut thanks for sharing
Leave a Reply