
Step 13
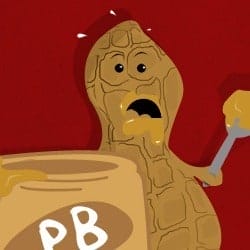
Use the pen tool or your favorite font to create the name. For this tutorial I will be using the letters “PB” for peanut butter. I created my letters by using the pen tool and the color #FFFFFF.

Step 14
Create a new layer and use the Elliptical Marquee tool to create the top of the inside of the jar and fill it with #A87540.

Step 15
Create a new layer and with your pen tool create the shadow. Make a selection of it and fill it with #432305

Step 16
Change the Opacity to 18%.

Step 17
Before using your pen tool change the settings of your Paint brush tool to a 17px Hard round brush. Use your pen tool to create the path at the top of the jar. Change the foreground color to #A87540. Create your path and right click the path and select ‘Stroke Path’. Make another line.

Step 18
Time to create the peanut butter. Create a new layer and make some peanut butter on the outside edge of the jar. Fill the selection with #C6912A

Step 19
Add this Layer Style.

Step 20
Now we will add some highlights to the peanut butter. Create a new layer and with a 25 px soft round brush make two dots along the peanut butter outline.

Step 21
Use your smudge tool to smooth out the dots. I set my smudge tool to 33% with a strength of 81%. Change the opacity of this layer to 30%

Use your pen tool and create another highlight at the tip using the color #FFFFFF

Step 22
Find your ‘jar’ layer and duplicate it (right click layer then duplicate). Change the Color Overlay and make the stroke invisible by clicking the eye icon next to the stroke layer. Change the opacity of this layer to 14%. Move it a few pixels to the left.

Step 23
Now we’re finished with the jar, time to start on one of the peanuts. Remember to create a new folder for the 1st peanut and place it beneath the jar folder. Create a new layer and with your pen tool create the shape of the peanut. Right click the path and make a selection from it and fill it with #b2833b

Step 24
Create a new layer above the shape of the peanut. Use the pen tool to create the shape of the shadow and make a selection of it and fill it with #432305.

Step 25
Change the Opacity of this layer 18%.
13 responses to “How to Create a Comic Illustration in Photoshop”
-

yeah i like it,you are creative
-
I love your all icon sets….and start to bookmark this!!!
-
hi I paul
-
MMMM yall should be very ashamed showin little kids to eat thier own family…..This is for all the little kids dont eat your own people like this picture is encourging to do!!Also this is very sad poor little kid forced to eat his people.
-
i like it !!!!!
-
Romans dad
-
this is great! thanks for sharing the knowledge.
-
The picture is so cute! I love it. It is very easy!
-
Great tutorial and some cool tips. Thanks for posting.
-
I like it
-
Cute picture…lots of great techniques for a beginner like me. Thanks!
-
Very good tutorial. Thank you.
-
Cute pic! Lol
Leave a Reply