
Use the brush tool (B) set to black (#f0db00) with opacity set to 20%.

Step 12
Load the selection you made in Step 11 and create a new layer (Ctrl+Shift+N) named “nose shadow” and move it over the “nose” layer. Brush the left side with black (#000000) as shown below.

Set the opacity to 20% and the result should look like this:

Step 13
With the same selection, create a new layer (Ctrl+Shift+N) named “nose reflection” and move it over the “nose shadow” layer. Brush the upper right side with white (#ffffff).

The result should look like this:

Step 14
Make a selection as shown below and create a new layer (Ctrl+Shift+N) named “left eye shadow”. Move it over the “nose reflection” layer. Use the brush tool (B) to brush the upper side of the eye.


Use a black (#000000) brush.

Set the fill to around 40%

Step 15
Make a selection like shown in the picture and delete the area from the layer you just made in the previous step.

Step 16
Do the same thing to the other eye. Make the selection on a new layer (Ctrl+Shift+N) and name it “right eye shadow”. Move it over the “left eye shadow” layer.

Brush the inside of the selection like in the previous steps with the same settings. Brush with black (#000000) and set the fill to 40%.

The result should look like this:

Step 17
Make a selection like in the picture and erase that area from the layer you made in the last step.

Step 18
Create a new layer (Ctrl+Shift+N) and name it “left eyebrow”. Move it over the “right eye shadow” layer. With the pen tool (P), make a path.

Make the eyebrows a light yellow color (#fff5ac) by creating a stroke path using a 20x brush with hardness set at 0%.

Step 19
Create a new layer (Ctrl+Shift+N) and name it “right eyebrow”. Move it over the “left eyebrow” layer and repeat the previous step to create the left eyebrow. Set the stroke path with the same settings.


Step 20
Create a new layer (Ctrl+Shift+N) named “chin”, move it under the “eyes background” layer. Make a selection like shown in the picture and brush it from below with white (#ffffff). The result should look like this: 20b shows.


Step 21
Create a new layer (Ctrl+Shift+N) and name it “forehead shadow”. Move it under the “hair” layer and make a similar selection like in the picture.
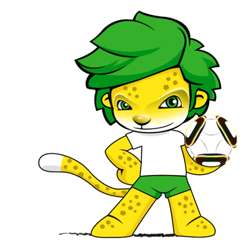
One response to “How to Draw a Lion Mascot in Photoshop”
-

you really didn’t cover the actual illustration shown in the original in your tutorial.
Leave a Reply