
Brush it with brush tool (B) using black (#000000).

Set the opacity to 20%.

Step 47
Create a new layer (Ctrl+Shift+N) named “ears lines” and move it over the “right eye dark zone” layer. Outline of the ears with the pen tool (P).

Fill the selection with the brush tool (B) using black (#000000).

Step 48
Create a new layer (Ctrl+Shift+N) named “body lines” and move it over the “ears lines” layer. Make the outline of the body by creating a path with the pen tool (P).

Make a stroke path with the brush master diameter set to 2px. Set the hardness at 0% in black (#000000).

Step 49
Create a new layer (Ctrl+Shift+N) named “arm details” and move it over the “body lines” layer. Use the pen tool to make some details on the right arm and fill the selection with the brush tool (B) in black (#000000).


Step 50
Create a new layer (Ctrl+Shift+N) called “hair lines” and move it over the “arm details” layer. Make the outline of the head and hair with the pen tool (P) and fill the selection with the brush tool (B) in black (#000000).


Step 51
Create a new layer (Ctrl+Shift+N) named “ball” and move it over “hair lines” layer. Make the outline of the ball with pen tool (P) and fill the selection with brush tool (B) in black ( #ffffff).


Step 52
Create a new layer (Ctrl+Shift+N) named “top yellow detail” and move it over the “ball” layer. Make the yellow detail of the ball with the pen tool (P) and fill the selection with the brush tool (B) using yellow (#ffe91c).


Step 53
Create a new layer (Ctrl+Shift+N) named “left top ball design” and move it under the “left top yellow detail”. Make the yellow detail of the ball with the pen tool (P) and fill the selection with the brush tool (B) using yellow (#323232).


Add a gradient to the layer as shown below.

Step 54
Duplicate the “left top yellow detail” and “left top ball design” layers and rename them “right top yellow detail” and “right top ball design”. Flip them horizontally (Free Transform (Ctrl+T) > Flip Horizontal) and move them to the right topside of the ball.

Step 55
Duplicate the layers “left top yellow detail” and “left top ball design” and rename them “down yellow detail” and “down ball design”. Rotate and move them until they look like how they are in the picture.
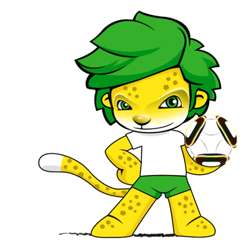
One response to “How to Draw a Lion Mascot in Photoshop”
-

you really didn’t cover the actual illustration shown in the original in your tutorial.
Leave a Reply