
Modify the angle of the gradient to 0 degrees.

Step 56
Create a new layer (Ctrl+Shift+N) named “ball grey lines” and move it over the “down yellow details”. Make the outline of the ball by creating a path with the pen tool (P)

Create a stroke path with brush master diameter set to 2px and hardness 0%. Use grey (#e4e4e4).

Step 57
Create a new layer (Ctrl+Shift+N) named “ball dark grey lines” and move it over the “ball grey lines” layer. Make a stroke path of the shape created in the previous step with brush master diameter set to 2px and hardness 0%. Use dark grey (#b9b9b9).

Step 58
Create a new layer (Ctrl+Shift+N) named “ball line” and move it over the “ball dark grey lines” layer. Make the outline of the ball by creating a path with the pen tool (P).

Make a stroke the path with brush master diameter set to 2px and hardness 0%. Use black (#000000).

Step 59
Create a new layer (Ctrl+Shift+N) named “shadow” and move it over the “ball line” layer. Create the shape of the shadow with the pen tool (P).

Fill the shape with black (#000000) using the brush tool (B) with hardness set to 100%.

Step 60
Now everything is finished! Save your work using the Save As option in the File menu. Name the file “Step 60” and select the format as “PNG (*.PNG).

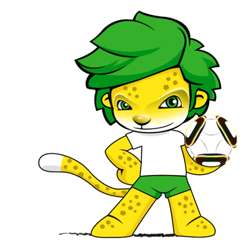
Final Results

One response to “How to Draw a Lion Mascot in Photoshop”
-

you really didn’t cover the actual illustration shown in the original in your tutorial.
Leave a Reply