

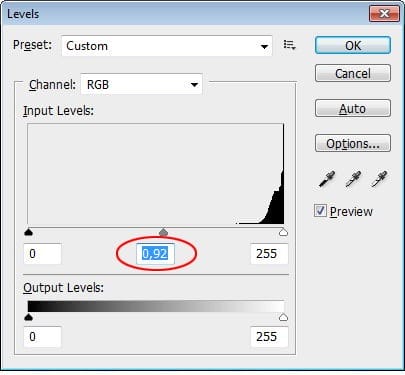
Step 21
To make it even darker add Levels (ctrl+L) and move grey arrow a bit to the right.
Step 22
Download paper texture from this page. Paste wrinkled-paper.jpg on top of our paper.

Step 23
Hit ctrl+alt+G to put the texture inside our paper. Change blend mode to Multiply and lower its opacity to 20%.

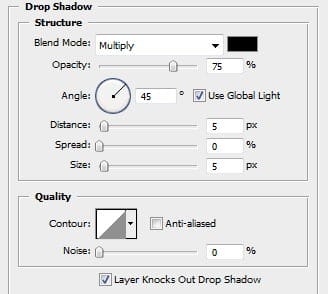
Step 24
Double click paper’s layer and add Drop Shadow. No need to worry about the setting, default setting is okay.
Step 25
Take a look at what we have now! Isn’t that stupid. In real life, there’s no shadow like this. Surely, we need to work on it.

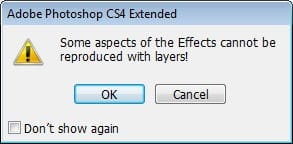
Step 26
From Layers panel right click layer styles list and choose Create Layer. This step will separate layer styles to its own layer and gives us full control. You might get warning dialog box, if you do just click OK.

Step 27
Activate the new shadow layer. Hit ctrl+T, right click and choose Warp. Drag the handles until you have a realistic shadow. And that’s it, we’re done with the paper napkin!


Step 28
Time to bring back the coffee. From the Layers panel click eye icon in front of the coffee group to reveal it.

Step 29 – Adding Coffee Stain
I want you to download coffee stain brush set from this page. Change foreground color to #6D5631 and paint one or two stains under the cup. Make sure you use brush size smaller size smaller than the cup or it will looks weird.


Step 30
You can stop here but I want to add more realism to this image. Create new layer and draw one more stain out side the paper napkin. I want to make impression as if the owner forget to put the cup on the napkin.

Step 31
Coffee stain outside the paper has to be different from those inside. Ctrl+click paper to create selection based on the paper size.

Step 32
Make sure the coffee stain layer is still active. Open Levels (ctrl+L) and move black slider to 50 to make the selected stain lighter.

Final Result
We’re done with this picture. Finally, you might want to add texture for the background. I hope you learn one or two techniques from this tutorial and have good time while doing it. Click on the image below or click here to see it in full size.

Download the PSD
7 responses to “How to Draw a Photorealistic Coffee Cup”
-

Tutorial still valid! Tried my hand at this some time in 2011. Still using it as a great example to teach people basic photoshop. Greetings from 2021. GJ OP!
-
awesome
-
love it, thank you!
-
I had hard time following tutorial.. although am still beginner..I think steps in making this aren’t detailed enough..but will try again and see x_x
-
Don’t try. Only do.
-
-
thank you for it! greetings from Poland! =)
-
cool
Leave a Reply