![27b[3] 27b[3]](https://cdn.photoshoptutorials.ws/images/stories/4896530f36e1_112DE/27b3.jpg?strip=all&lossy=1&webp=82&avif=82&w=1920&ssl=1)
Choose to Filter > Noise > Add Noise and apply a 25% noise filter.
![27c[4] 27c[4]](https://cdn.photoshoptutorials.ws/images/stories/4896530f36e1_112DE/27c4.jpg?strip=all&lossy=1&webp=82&avif=82&w=1920&ssl=1)
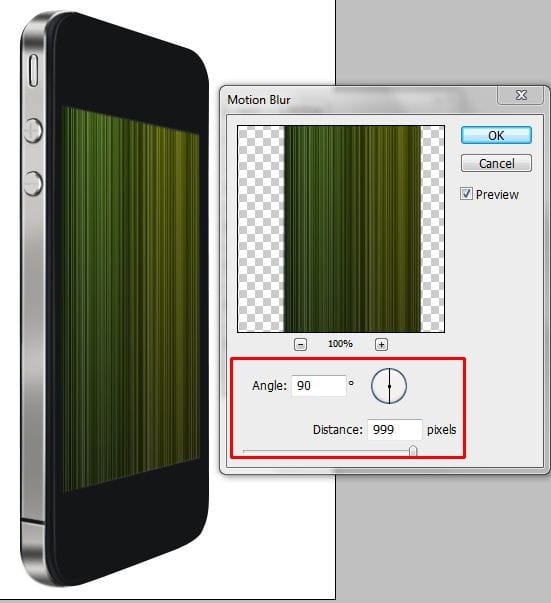
Now choose Filter > Blur > Motion Blur and apply the following settings:
-
Angle: 90°
-
Distance: 999 pixels

Step 28 – Add a glow to the upper area of the wallpaper graphic
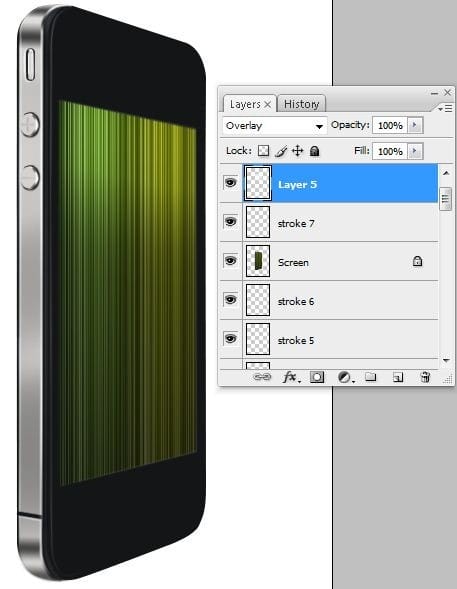
Create a new layer then set the foreground color to white. Load the selection of the “Screen” layer (Ctrl+click on the layer thumbnail or Layer > Load Selection). Use the Brush tool (B) to paint the top area with white.
![28a[3] 28a[3]](https://cdn.photoshoptutorials.ws/images/stories/4896530f36e1_112DE/28a3.jpg?strip=all&lossy=1&webp=82&avif=82&w=1920&ssl=1)
Change the blending mode of the current layer to Overlay.
![28b[4] 28b[4]](https://cdn.photoshoptutorials.ws/images/stories/4896530f36e1_112DE/28b4.jpg?strip=all&lossy=1&webp=82&avif=82&w=1920&ssl=1)
Choose Filter > Blur > Motion Blur and apply the following settings:
-
Angle: 90°
-
Distance: 125 pixels

This is what your image should look like.

Step 29 – Add contrast to the base layer
Select the “Base” layer then open the Brightness/Contrast tool (Image > Adjustments > Brightness/Contrast). Make sure that the “Use Legacy” option is off. Set the contrast to +85 then click OK.

Step 30 – Draw the front iPhone camera
Now we’ll draw the camera used for the FaceTime feature on the iPhone 4. Create a new layer then use the Elliptical Marquee tool (U) to create an oval like the image below. Fill it with gray.
![30a[4] 30a[4]](https://cdn.photoshoptutorials.ws/images/stories/4896530f36e1_112DE/30a4.jpg?strip=all&lossy=1&webp=82&avif=82&w=1920&ssl=1)
Select the Burn tool then apply the following settings in the option bar.
- Master Diameter: 10 pixels
- Range: Shadows
- Exposure: 7%
![30b[4] 30b[4]](https://cdn.photoshoptutorials.ws/images/stories/4896530f36e1_112DE/30b4.jpg?strip=all&lossy=1&webp=82&avif=82&w=1920&ssl=1)
Select the Lasso tool (L) to create a rough selection of the bottom left half of the oval like shown in the image below. Choose Select > Modify > Feather and feather the selection by 1 px.
![30c[3] 30c[3]](https://cdn.photoshoptutorials.ws/images/stories/4896530f36e1_112DE/30c3.jpg?strip=all&lossy=1&webp=82&avif=82&w=1920&ssl=1)
Select the Burn tool (O) to burn the edge so that your camera looks like the image below.

Step 31 – Add a lens reflection to the front camera
Select the Brush tool then apply the following settings in the option bar:
- Master Diameter: 6 pixels
- Hardness: 50 %
- Mode: Normal
- Opacity: 100%
Set the foreground color to #002149.
![31a[4] 31a[4]](https://cdn.photoshoptutorials.ws/images/stories/4896530f36e1_112DE/31a4.jpg?strip=all&lossy=1&webp=82&avif=82&w=1920&ssl=1)
Create a new layer.
![31b[3] 31b[3]](https://cdn.photoshoptutorials.ws/images/stories/4896530f36e1_112DE/31b3.jpg?strip=all&lossy=1&webp=82&avif=82&w=1920&ssl=1)
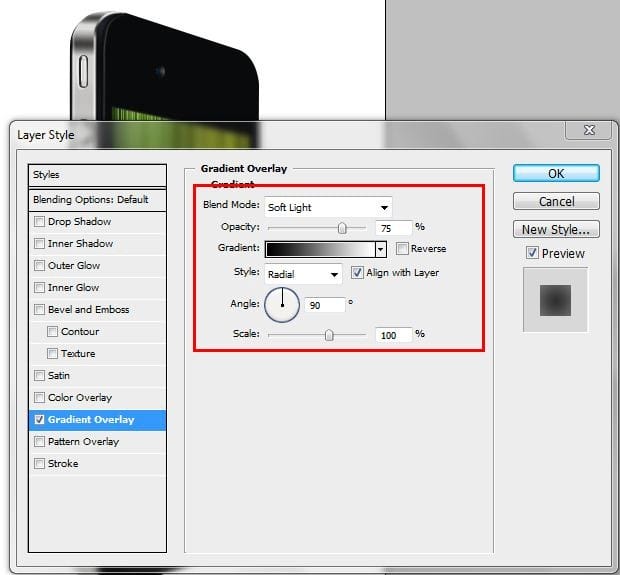
Add a blue spot using the Brush tool (B) on the edge the front iPhone camera like shown in the image below. Choose Layer > Layer Style > Gradient Overlay and apply the settings shown in the image below.

Step 32 – Create the speaker
Create a new layer.
![32a[3] 32a[3]](https://cdn.photoshoptutorials.ws/images/stories/4896530f36e1_112DE/32a3.jpg?strip=all&lossy=1&webp=82&avif=82&w=1920&ssl=1)
Use the Rounded Rectangle tool (U) to create a shape like shown in the image below. Use the Rotate tool (Edit > Transform Path > Rotate) to get it aligned with the iPhones perspective. Right click on the path then choose Make Selection.
![32b[3] 32b[3]](https://cdn.photoshoptutorials.ws/images/stories/4896530f36e1_112DE/32b3.jpg?strip=all&lossy=1&webp=82&avif=82&w=1920&ssl=1)
Use the Dodge and Burn tools (O) to create a bevel like shown in the image below. To do this, use a small brush with a hardness of around 50%. The brush size should be about the width of the speaker. Dodge the bottom area then burn the top area. Finish it off by selecting the Brush tool with a hardness of 75% and painting a gray stripe in the middle of the speaker.
2 responses to “How to Draw a Photorealistic iPhone 4 in Photoshop”
-
I realy like your site and get what i looking for thank you very much.
-
thank yhu
-


Leave a Reply