
Step 6
And now choose the sketch layer. When you select the sketch layer it will be look like this. To select the sketch layer hold down the Ctrl (Win) / Command (Mac) key and and at the same time click on the Big_eyed_Fox_sketch Layer icon on the Layers palette.

Step 7
Click on the New Layer icon at the bottom of the Layers palette, and after that open a new layer. And now choose the (#472918) color. This will be the new color for the character outline.

Step 8
Choose the Paint Bucket Tool (G)fill the new layer with this new color. This is a new color for the character outline.

Step 9
To create the soft glow effect, we need to blur the image on our “Gaussian blur” layer. Go to Filter/Blur/Gaussian Blur.

Step 10
Here when you click on Gaussian Blur , you are going to see a new little window…. This will bring up Photoshop’s Gaussian Blur dialog box. Drag the Radius slider at the bottom of the dialog box towards the right to increase the amount of blurring that’s being applied to the layer, or drag the slider to the left to decrease the blur amount.

Step 11
Choose radius 6,2 and click OK when you’re done to accept the blur effect and exit out of the dialog box. Here’s my image sketch after applying the Gaussian Blur filter…See the difference?

Step 12
Then Choose Layer > Merge Layers. Merge down is found by selecting Layer/ Merge Down, or by clicking on the arrow in the upper right-hand corner of the Layer Palette and selecting it:

Step 13
The two layers are now merged together. You should notice the two layers are just one layer in the Layers palette. When you are painting on Adobe Photoshop, often you will want to combine two layers into one, so that adjustment you make (which aren’t layer adjustments) will apply to both of them.

Step 14
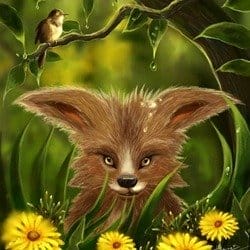
Now it is time to clean it up!Taking eraser tool erase all the access skin that will be touching to the background. Taking a small soft brush and setting is about 40% -30%. I go around with my brush tool that are going to be highly shaded. Start to add a new layers to add shades and shadows.And shadows doesn’t have to be always be darker versions of the color used for the base color. it can be other colors too. Start by the darker colors,then, little by little add the light. Here it looks clean now and as you see I open the first sketch layer too.
One response to “How to Paint an Artwork of a Fox Inside Photoshop”
-

REALLY GREAT WORK…………
Leave a Reply