
Step 31
Now I’ll open a new Layer Group. With a Layer Group your layers palette will look less cluttered and there will be less need to scroll.Create a new Layer Group by clicking on the Layer Group icon Layers Palette at the bottom of your layers palette. It’s important that you name your layer groups, otherwise you will get confused when you have a few of them. My Layer Group name is “Bird” and drag your layers for bird to this Group.

Step 32
After naming the Layer, make a new layer in this Group and name it Light…I used a large soft brush with a yellow color.To add lighter fur use a medium size hard brush and turn down the opacity and flow to 60%. At this step I would like to detail to eyes and its body feathers. Try not to lift your pen too much. Too many stroke will destroy the smooth gradient effect we are trying to achieve.

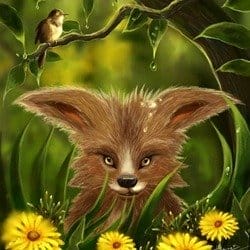
Final Results
Ok…that’s all for today.Note that every artwork is different. These are just the steps I used in creating this specific artwork. Use these techniques as you see and have fun :) if you have any questions, feel free to send a commend on this page. I hope this has been helpful in some ways..Always keep practicing…Always use your imagination

One response to “How to Paint an Artwork of a Fox Inside Photoshop”
-

REALLY GREAT WORK…………
Leave a Reply