

Step 35
Use the burn tool on its previous settings to add shadows to the two outcroppings.

Step 36
Use the blur tool on the “color block” layer to blue out the back of the right middle building. This will give the impression that the bricks are disappearing into the distance.

Step 37
Draw a shadow behind the middle arches on the left buildings with color #AB9773 (opaque, hard-edged brush).

Step 38
Fill the bottom half of the two windows on the bottom left row with color #A27C69 (opaque).

Step 39
Fill the bottom section of the three back windows with color #AB9773 (opaque). Draw a short stripe above the section.

Step 40
Use color #C6B28F (opaque) to extend the sections onto the outer wall.

Step 41
Select the left buildings and apply a Burlap texture with the Texturizer filter. Set the scaling to 50%, the Relief to 2, and the Light Direction to Top Left.


Step 42
Use color #66553D (opaque) to add three “X”s in the left window box.

Step 43
Add shadows to the window box using the burn tool on the same settings.

Step 44
Highlight the window box with the dodge tool on its previous settings.

Step 45
Add shadows to the back balcony on the right side with the burn tool. Highlight with color #BDC9DB (20% opacity, soft-edged brush).

Step 46
Apply the brick texture to the chimney. Use the same settings as before.


Step 47
Block in plants in the two window boxes and on the floor of the middle-building’s balcony with color #3A4C16 (opaque).

Step 48
Highlight using the dodge tool (highlights mode, 31% opacity) and add shadows with burn tool (midtones mode, 16% exposure).

Step 49
Use the dodge tool and burn tool to add dimension to the base of the middle right building.

Step 50
Apply a Craquelure filter to the left pillars. Set the Crack Spacing to 16, Depth to 1, and the Brightness to 7.

![Venice Part II HTML_html_m5ecf24a7[1]](https://cdn.photoshoptutorials.ws/images/stories/c9329086a76d_11664/Venice-Part-II-HTML_html_m5ecf24a71.jpg?strip=all&lossy=1&webp=82&avif=82&w=1920&ssl=1 "Venice Part II HTML_html_m5ecf24a7[1]")
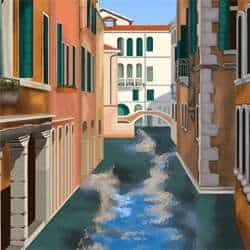
And you are done!
Final Results
![Venice Part II HTML_html_m5ecf24a7[2]](https://cdn.photoshoptutorials.ws/images/stories/c9329086a76d_11664/Venice-Part-II-HTML_html_m5ecf24a72.jpg?strip=all&lossy=1&webp=82&avif=82&w=1920&ssl=1 "Venice Part II HTML_html_m5ecf24a7[2]")
Authors Comment
 Thank you for reading this tutorial! I hope you enjoy recreating this scene in Venice as much as I enjoyed painting it! I have more drawing tutorials here: https://www.how-to-heaven.com/!
– Joelle Vaughan
2 responses to “How to Paint Venice in Photoshop”
-

Link is working for my computer
-
can you give a new link to the photo please
Leave a Reply