
Step 50
Draw to arches on top the ledge you just drew.

Step 51
Make the arches 3D by adding a second curve the the right side of each.

Step 52
Repeat steps 49-50 for three more columns on the bottom row.

Step 53
Add two rounded bases to the bottom of each arch.

Step 54
Draw the outer corner of a window on the second building to the right (use 5 pixel the line tool).

Step 55
Use the same tool to draw a window shutter with short lines inside the rectangle.

Step 56
Draw three rectangles, one under the window, one two thirds of the way up, and one at the top of the window.

Step 57
Begin to draw a balcony on the middle building.

Step 58
Draw a vertical line attaching to the balcony. Also draw an outcropping on the building. The best advice I can give for this step is to reference the drawing and replicate what you see.

Step 59
Begin fleshing out the balcony. Draw a rectangle within the front side and add a thick band around the bottom.

Step 60
Draw a curving base attaching the balcony to the outcropping.

Step 61
Draw two open shutters on the balcony.

Step 62
Draw two more shutters open at an angle.

Step 63
Draw two more shutters on the building behind the balcony.

Step 64
Draw a row of windows across the right building.

Step 65
Draw another balcony and divide the ledge below the top tight windows into two ledges. Draw a second molding on the right building next to the first that wraps around the corner of the building.

Step 66
Draw a rounded base on the middle right building.

Step 67
Turn the bottom line of the right building into a line of molding. Draw two lines above the base of the middle building.

Step 68
Roughly draw the stack of stones on the middle right building.

Step 69
Use the line tool to draw the top stones.

Step 70
Draw another line from the vanishing point at a 140 degree angle.

Step 71
Draw another line at a 170 degree angle.

Step 72
Use the line tool (4 pixels) to sketch in all the windows on those lines on the left buildings. There should be six in all with two shutters.

Step 73
Erase the top line.

Step 74
Draw the last three windows.

Step 75
Erase the bottom line.

Step 76
Draw another line from the vanishing point at a 130 degree angle.

Step 77
Draw a second line at a 22 degree angle.

Step 78
Draw three shutters with the line tool.
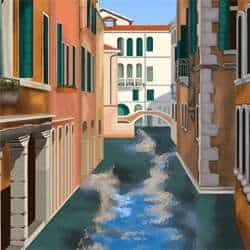
2 responses to “How to Paint Venice in Photoshop”
-

Link is working for my computer
-
can you give a new link to the photo please
Leave a Reply