
Step 105
Use the blur tool (100% strength) on the rectangles. Block in the top roof area with color #FAEFD9 (15 pixel soft-edged round brush, opaque).

Step 106
Paint the chimney with color #E8D7B9. Block in the last building with color #BF895E (Front side) and color #9B7251 (side facing out).

Step 107
Fill the little roof with color#C29B5F and add shadows around it with color #593B36 (17 pixel soft-edged brush, 40% opacity). Highlight the roof with color #FAEFD9.

Step 108
Highlight the window glass with color # and add a shadow to right above the glass with color # (both 40% opacity soft-edged brush). Use color #644844 and the same brush to add shadows to the roof above it.

Step 109
Begin blocking in shadows in the water with color #293535 (38% opacity, 210 pixel brush).

Step 110
Use the same brush and color #24322E to deepen the shadows.

Step 111
Fill the top center of the water with color #1280C8 (same brush) and then use the smudge tool to shape it.

Step 112
Continue using the same brush to highlight the blue with color #CFCCC7.

Step 113
Brush color #406A62 (50% opacity, soft-edged brush) where the reelections are cast by the boats in the reference photo.

Step 114
Highlight the light reflections with color #DCC3AC and the same brush.

Step 115
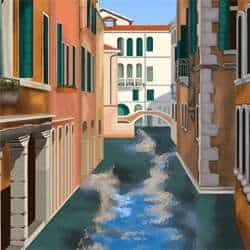
We are going to use three filters to give the canal a “watery” appearance. Begin by applying a Glass filter to the “background” layer. Set the Distortion to 14, the Smoothness to 10, and Texture to “Frosted”, and the Scaling to 200%. Check the “Invert” box if you wish.


Step 116
Next, apply a “Watercolor” filter. Set the Brush Detail to 14.


Step 117
Apply as last filter, “Smudge Stick,” to the layer. Set the Stroke Length to 0, the Highlight Area to 9, and the Intensity to 4.


Step 118
Make a new layer, “Color Block”.

Step 119
Fill in most of the windows with color #106358 (opaque). Use the same color to fill the bottom left arch of the middle “connector” building as well as all the shutters.

Step 120
Fill in the rest of the windows in the middle building with color #8CA394 (opaque). Fill in the balcony as well.

Step 121
Fill the inside of the bridge with color #BF895E . Leave a white trim on its edges.
2 responses to “How to Paint Venice in Photoshop”
-

Link is working for my computer
-
can you give a new link to the photo please
Leave a Reply