
Step 144
Block in the shadows on the “L” shaped building with color #EDB58E (same brush).

Step 145
Color the left outcropping with color #EDB58E (40% opacity).

Step 146
Block in the shadows on the white building with color #9CA1AE (35% opacity, soft-edged brush).

Step 147
Fill the top of the “L” shaped building with color #8D5A37.

Step 148
Ring the top of the area you just filled with color #FFF8E7.

Step 149
Finish the basic block-in by adding shadows the the middle right building with color #5C4431 (30% opacity).

Step 150
Use the same brush and color #7A7F8F add a cast shadow from the buildings to the right hand side of the bridge.

And you are done!
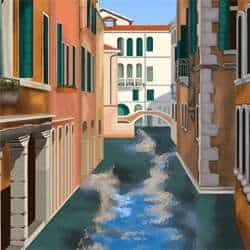
Final Results

 Finish painting a venetian street. Learn how to recreate brick textures, plants, and tiled roofs.
Preview of Final Results

Venetian Street Part II
Resources
Step 1
Select the front part of the middle right building (“Color Block” layer).

Step 2
Apply a Texturizer filter to the section. Set the texture to “Brick”, the Scaling to 157%, and the Relief to 6.


Step 3
Select the slanted side of the building. Copy and paste this selection onto a new, temporary layer.

Step 4
Use the Skew tool to turn the selection into a rectangle.

Step 5
Apply the same filter to the layer and skew the rectangle to match the building.

Step 6
Use steps 3-5 to texturize the far right building.

Step 7
Make a new layer, “Detail” above all other layers.

Step 8
Turn the “Top Outline” layer off. Paint the top of the middle building balcony with color #FCF6E5 (75% opacity, 8 pixel hard-edged brush). Paint the bars between the bottom and the top bar with color #DFE0D0 (same brush, opaque).

Step 9
Add shadows to the light green windows in the middle building with color #3B4841 (15% opacity, 10 pixel soft-edged brush).

Step 10
Add shadows to the dark green windows with color #123139 (same brush).

Step 11
Highlight the largest arch of the middle building with color #4B9E81 (40% opacity, 25 pixel soft-edged brush).

Step 12
Paint shadows in the rest of the middle arches with color #4B9E81 (same brush).

Step 13
Select the two sections of red roof and apply a brick texture. Set the Scaling to 66%, the Relief to 5, the Light Direction to Top Right, check the Invert box.


Step 14
Use the dodge tool (highlights mode, 44% exposure) to add vertical lines to both sections of roofs.
2 responses to “How to Paint Venice in Photoshop”
-

Link is working for my computer
-
can you give a new link to the photo please
Leave a Reply