
- Brush size: Soft round 70px
- Hardness: 0%
- Opacity: 83%
- Flow: 100%
- #: ffe400

The result should be similar to this:

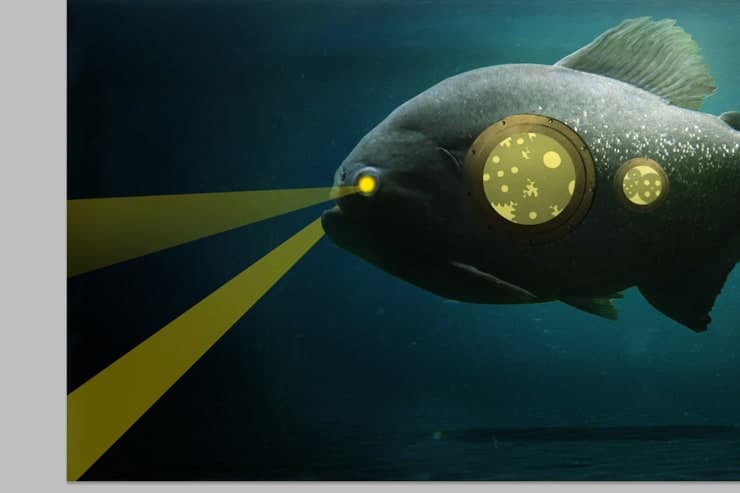
Step 31
Next, we will make lights direction. To start, create a new layer (Ctrl/Cmd + Shift + N) and activate Pen Tool (P).

After you done with the Pen Tool (P), don’t forget to make a selection to get the dotted line area. Then, activate the Paint Bucket Tool (G) and set the color #ffe400.

And set the layer opacity in 38%, you will get like this.

Now, activate the layer mask and activate the “Brush tool” (B) and set the following:
- Brush size: Soft round 500-600px
- Hardness: 0%
- Opacity: 30%
- Flow: 100%
- #: 000000

Note: Mask the full area first (red line area), then mask again in the below (green line area). The result should be similar with this.

Step 32
Next, we wiil make the second light. Create a new layer (Ctrl/Cmd + Shift + N) and activate Pen Tool (P).

After you done with the Pen Tool (P), don’t forget to make a selection to get the dotted line area. Then, activate the Paint Bucket Tool (G) and set the color #ffe400.

The second shape is hit the fish image. We will make the light look appear behind of the fish. Now, go to the layer “Fish” image, activate the Magic Wand Tool (W) and make a selection like this:

Now, go back to the layer you create the second light shape then activate the layer mask. The result should be similar to this:

And set the layer opacity in 38%, you will get like this.
Now, activate the layer mask and activate the “Brush tool” (B) and set the following:
- Brush size: Soft round 500-600px
- Hardness: 0%
- Opacity: 30%
- Flow: 100%
- #: 000000

Note : this step is same with the step you mask the first light. The result should be like this.
Step 33
In this step, we will blend the sea with a texture. To start, open the image “Texture 2” by kuschelirmel-stock.

Now, activate the layer mask and activate the “Brush tool” (B) and set the following:
- Brush size: Soft round 600px
- Hardness: 0%
- Opacity: 100%
- Flow: 100%
- #: 000000
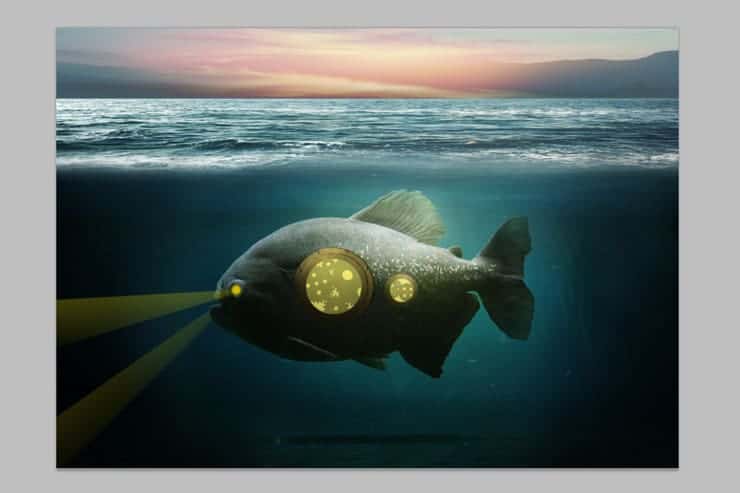
The result should be similar to this:
Step 34
In this step, we will be adding a boat silhouette. Let’s open the ” Boat” image by Chibiangel-stock. Make a selection with Polygonal Lasso Tool (L) or Pen Tool (P).

Copy (Ctrl/Cmd + C) and paste (Ctrl/Cmd + V) it into our work canvas. Then activate the Transform Tool (Ctrl/Cmd + T) and position the boat like the image below.

Next, create a new adjustment layer “Levels” then activate the clipping mask to the boat layer. Set the following like this:
17 responses to “How to Create a Beautiful Underwater Surreal Scene in Photoshop”
-

Mooi werk, dankje!
-
Thanks a lot, this is my first try at surreal and your specifications were very exact.wish to attach my output here.
Thanks a lot, learned a lot, done a lot with simpler tricks.
-
hello its cool
-
This is awesome
-
when i try to brush the sky, it only gives me variations of grey I can’t use colors for some reason =[
-
Bloody hell! Awesome work man!
-
step 33: where to brush and where to place the texture?
-
I’m really sorry, maybe there’s an error when they upload it. I already sent an email to the admin, I hope they can fix it asap. I give the JPEG file for the complete step 33, you can download it here https://www.dropbox.com/s/u33iqxc9stbvvzb/step33.jpg?dl=0
Thank you
-
-
in step 27 I get these oversaturated pixels. Is there another way to get rid of them without using clone stamp? https://onedrive.live.com/redir?resid=95141D5708B162B1!221924&authkey=!AIcVgO6H6-DH6rA&v=3&ithint=photo%2cpng
-
In step 27, I’m using brush. It’s okay if you use the stamp tool, the result is totally same. I already remind a note in this step about making silhouette with the levels adjustment effect is not always make the image change into totally black, it depends with the quality of the image. Thank you.
-
-
Thanks good
-
Beautiful tutorial gerda
-
Thanks for a good detailed tutorial.
-
it is a good tutorial.thanks
-
I can download other files, but the zip files just interrupt randomly and cannot be opened even if the download is full. Please check all links before posting a tutorial.
-
Hello Iulian, I’m sorry for the late reply. The zip files is totally fine, I already check it. Thank you.
-
-
cool
Leave a Reply