
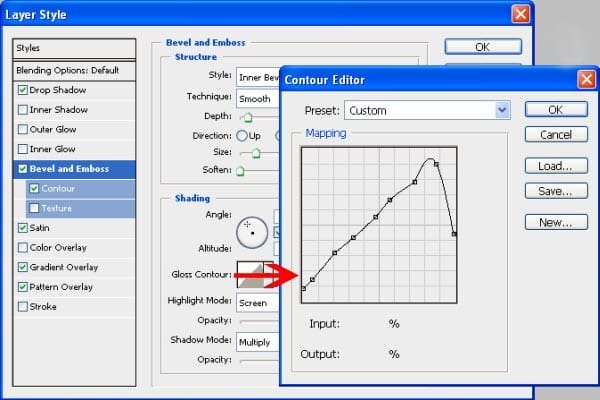
Click on the Gloss Contour option to bring up the Contour Editor. Create a contour like shown in the image below.
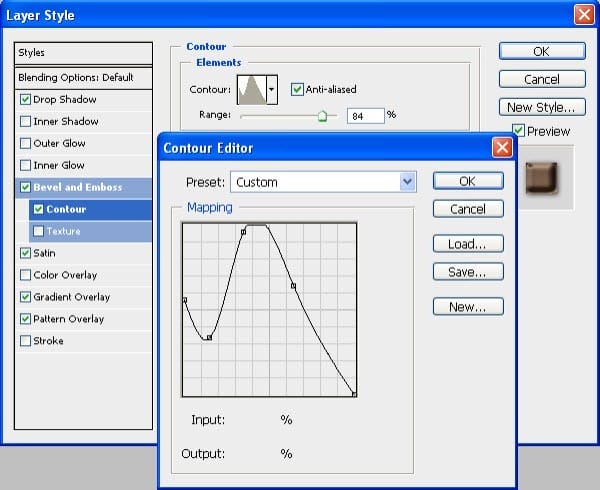
Enable the Bevel and Emboss > Contour style then adjust the Contour like shown in the image below.
Step 9
Now enable the Satin style and apply the settings shown in the image below.

Set the contour to the one shown in the image below.

Step 10
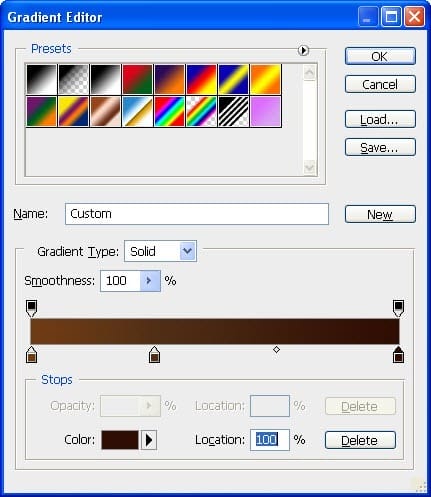
Enable the Gradient Overlay option then set the settings shown below. Click on the Gradient to bring up the Gradient Editor.

Recreate a Gradient shown below; we used the colors #6F3B14, #512E15, and #2f0D03 (from left to right)
Step 11
Finally, enable the Pattern Overlay style then apply the settings shown below.

Here’s what the text effect looks like!

Step 12
Next, we’re going to add the Happy text. For this text, I used the “Fiolex Girls” font. Use the Text tool to add the text.
To give it a chocolaty text effect, copy and paste the layer style from the Valentine’s day text to the Happy text. To do this, select the Valentine’s day text layer then go to Layer > Layer Style > Copy Layer Style. Select the Happy text layer then go to Layer > Layer Style > Paste Layer Style.

Step 13
Now we’re going to add a small heart. Download the LM Cupids font then type any picture you want using the Text tool. I typed the letter U to get the image shown below.

Step 14
Like what we did earlier, copy and paste the layer style into the heart text that we created. To do this, select any one of the text layers with the layer style then go to Layer > Layer Style > Copy Layer Style. Select back the layer with the heart then go to Layer > Layer Style > Paste Layer Style.

Step 15
Now we’re going to add a drip to the top of the image. Start by creating a new layer and position it above all the other layers. Use the Pen tool to create a shape like shown below. Right-click on the path then choose “Make Selection”. This will create a selection out of the path. Fill the selected area with brown.

Step 16
Now we’re going to copy and paste the same layer style onto the drip. Select any one of the previous layers with the layer style then go to Layer > Layer Style > Copy Layer Style. Select back the layer with the drip then go to Layer > Layer Style > Paste Layer style.
19 responses to “How to Create a Chocolaty Valentine’s Day Card for Your Girlfriend”
-
No step 15.
-
Who else thinks this is Amazing?
-
Hand raised
-
-
amazing im eating this its awesome cool 4 lyfe unstopable
-
cool, but how to make the love shape like that?
-
i have downloaded the psd , but unable to edit the letters … i want to put my name .
If not can someone help me in creating a logo/signature to keep for all my photographs ?
Thanks,
Jas. -
Looks great, definitely try to do myself.
-
Very difficult.
Do not recommend unless you like tearing your hair out. -
Very difficult
-
It’s gorgeous and very easy, thanks a lot for this tutorial, i inspired to make my logo.
-
**** this
-
Agreed
-
-
where to get these font? how are they called?
-
The author didn’t use any font – it was hand-drawn (see step 5)
-
-
but I don’t have a girlfriend
-
i can be ur girlfriend :)
-
-
Thanks for this tutorial
-
this easy to do


Leave a Reply