step-007
Set this layer’s blending mode to “Overlay”.
step-007a
Create another layer and set your Brush now to something about 25% opacity brush again over the edges but now set this layer’s blending mode to “Multiply”.
step-007b

Step 8

Take the Statue stock image and open it in Photoshop. Go to Image>Image Rotation>Flip Canvas Horizontal. Then using the pen tool, Extract the statue from the background maintaining as much detail as possible and then drag it to your document resize if necessary.
step-008
step-008a

Step 9

Once you have the statue image set on your document, we need to make a shadow for it to cast on the sand. Duplicate the statue layer and bring up the Hue and Saturation menu (Ctrl+U) bring the Lightness value to -100:
step-009
Move this layer below the statue layer. Now we need to transform it to match the perspective of the floor. While in the Move tool (V) Hold Ctrl and drag the anchor points of the shape down to create the effect of perspective. Use the image below as a reference.
step-009a
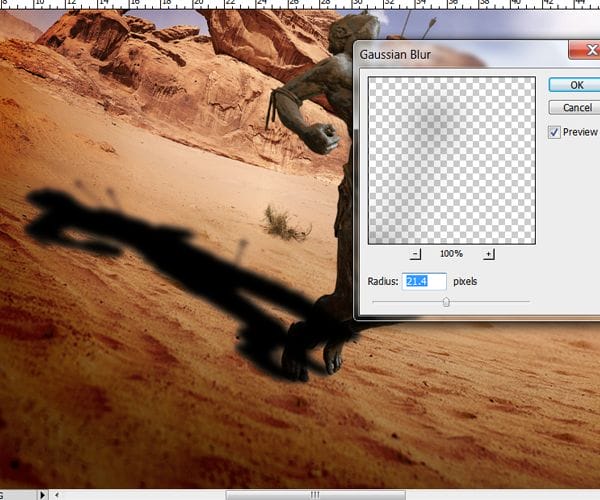
Go to Filter>Blur>Gaussian Blur and apply a blur with a radius of about 21 pixels:
step-009b
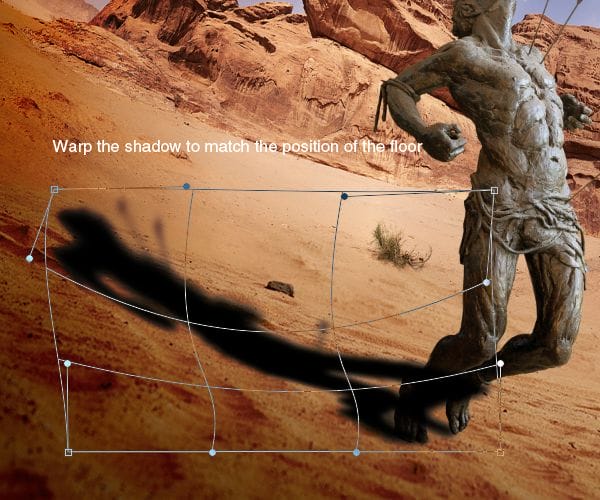
Now we need to warp a little bit the shape to match the curve of the floor:
step-009c
Take the Eraser tool (E) and select a soft round brush with 70% opacity and erase the upper part of the shadow.
step-009d

Step 10

In this step we are going to create all the adjustment layers that will give the image a very nice contrast and coloring. I suggest you group all these layers inside a new Group (Ctrl+G) and keep it on top of all the desert and statue layers, this way we can have things more organized. First we need to change the curves setting on the image. Go to Layer>New Adjustment Layer>Curves and use the settings below to get nice contrast on the image:
step-010
Now we are going to use several color fill layers in different layer blending modes and opacities to get the color. Below the Curves layer, Create a new Color Fill Layer, to do this, go to Layer>New Fill Layer>Solid Color. For the first Layer, use a Dark blue color #070d5f with the layer blending mode set to “Overlay” with 25% opacity. For the second one, use a Red color #d30c0c with the layer blending mode set to “Overlay” and 15% opacity. The third one should be a dark green #007711 set to “Color” with the layer opacity set at 20%. The last one should be an orange color #cb4105 set to “Color” with the layer opacity also at 20%.

Pages: 1 2 3 4

13 responses to “How to Create a Dramatic Fisheye Spartan Scene with Photoshop”

  1. Vector Designs Avatar
  2. Pragyan Prakash Avatar

    have you posted this on youtube channel? if not plz do most of us are waiting for that.

    1. Vector Designs Avatar

      absolutely couldnt agree more :D

  3. vendle Avatar
    vendle

    You can do so much with layer mask. This is a great tutorial that you can learn a lot from. By looking at the end result, I would not have made it there without the steps you provided.

  4. PhotoTrims Avatar
    PhotoTrims

    Talented !! No doubt about it this is awesome.

  5. steve Avatar
    steve

    Really like the finished image.

  6. Raghavendra Avatar
    Raghavendra

    really nice! thank you very much.

  7. RobbCobb Avatar
    RobbCobb

    Thanks, that was pretty cool!

  8. kishore Avatar
    kishore

    nice tutorial

  9. Juggy Avatar
    Juggy

    awesome

  10. Joy Avatar
    Joy

    Thank you!

Leave a Reply

Discover more from Photoshop Tutorials

Get the latest Photoshop tutorials, download and updates delivered to your inbox.

Continue reading