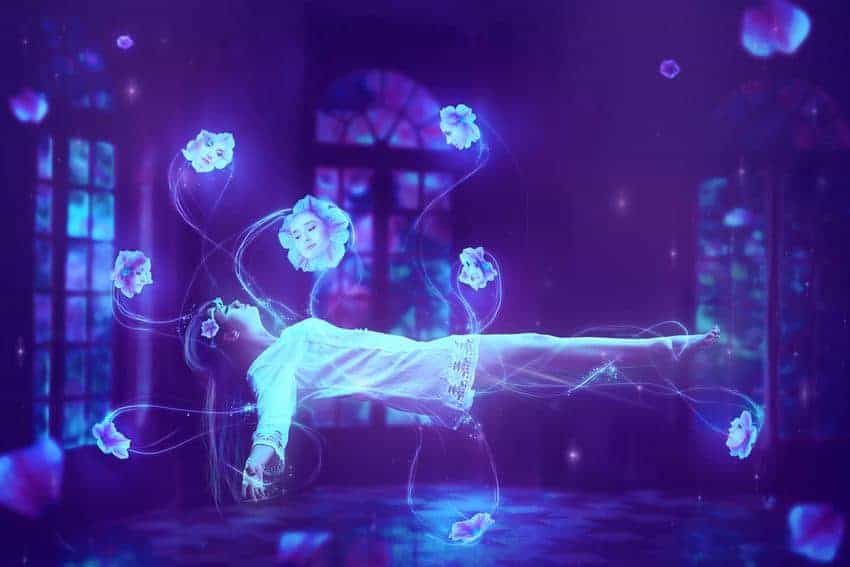

Step 28
Add the face 3 to the flower below the model’s legs. Use a layer mask to blend this face with the flower.

Step 29
Make a Hue/Saturation adjustment layer to desaturate the face:

Create a Color Balance adjustment layer to change the color of the face.

Add a Curves adjustment layer to make the face darker and fit the background.

Step 30
Add the face 4 to the flower on the top left of the face 1 and blend it with the flower using a layer mask.

Step 31
Make a Hue/Saturation adjustment layer and reduce the Saturation values to -43:

Create a Color Balance adjustment layer to give the face some subtle purple tone.

Use a Curves adjustment layer to darken the face.

Step 32
Add the face 5 to the flower on the upper left of the model’s head using the same method:

Step 33
Make a Hue/Saturation adjustment layer to desaturate the face.

Add a Color Balance adjustment layer and change the Midtones values:

Create a Curves adjustment layer to reduce the lightness to make face fit the background.

Step 34
Use the same method to blend the face 6 with the flower on the lower right of the face 1.


Step 35
Make a new layer on top of the layer and use a soft brush with the color #9772bf to paint over the flowers around the model. Add a mask to this layer to reduce the dreamy effect, making appear more subtle.


Step 36
Create two layers and use a small brush with the color #d1a4c9 to paint lines from the flowers with the faces to the all of the model’s body. Use a layer mask if needed to remove the unwanted details or reduce the lines’ opacity, making them smooth and more natural.


Step 37
Double click the second lines layer, choose Outer Glow. Set the color of glow to #fcfcfc.


Create a new layer and use a very small brush with the same color to paint dots on some of the lines and apply the Outer Glow effect with the same settings. This step is to add some magical effect for the scene.

Step 38
Make a Selective Color adjustment layer on top of the layers and change the Reds, Blues and Magentas settings:


Add a Color Balance adjustment layer and alter the Midtones and Highlights values:
5 responses to “How to Create a Fantasy Floating Scene Photo Manipulation with Photoshop”
-

This looks like a great tutorial but on my Mac with Safari every image is small (approximately half the width it’s supposed to be).
-
Sorry error on our website’s end. It’s fixed now :)
-
-
Thank you, Denny Tang, That was so kind to find a similar image to use for practice….:)
-
I love your detailed instructions, but do you have another source for the floating model where I don’t have to open yet one more photo purchasing account just to practice a cool technique? It gets expensive after awhile!
-
Try using this image and rotating it 90 degrees:
https://www.deviantart.com/faestock/art/Seraphim-Stock-Reference-13-553424364
-
Leave a Reply