Preview of Final Results

Tutorial Resources
- Model– faestock
- Background– Jess8181
Wings– shoofly-stock(Alternative)Texture–greenaleydis-stock(Alternative)- Tree Heart– cosmiksquirelstock
- Leaves– sammykaye1sstamps
- Hair– Dezzan
Step 1 – Model
Choose the model.
Step 2 – Select the model
Use the Pen Toolto select the model. Make sure the option is in “Paths” like you see in the little box below.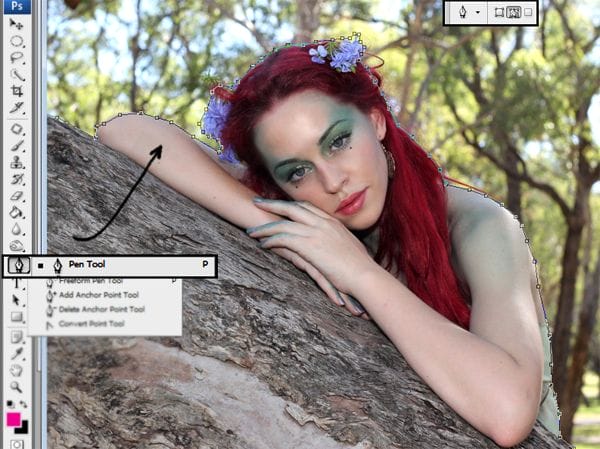
Step 3 – Make the Selection.
When you end with the selection press right-click. In the menu you have on the screen, choose the option make selection.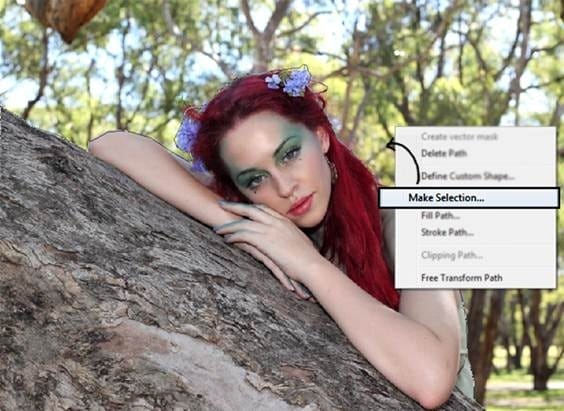

Step 4 – Subtract model from the background
Press Ctrl+J to duplicate the model’s selection you made before. The result has to be like this: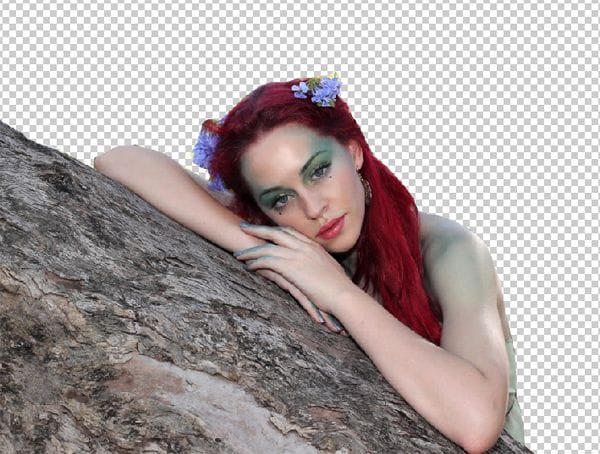
Step 5- Open a new file
To open a new file go to the menu File – New or press Ctrl+ N. The resolution is Width: 1750 x Height: 1400 pixels.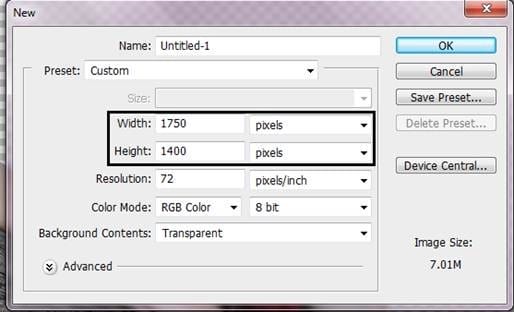
Step 6 – Resize the model.
Now put the model in the new file and change the size to fit this resolution. To change the size press Ctrl + T (Free Transform).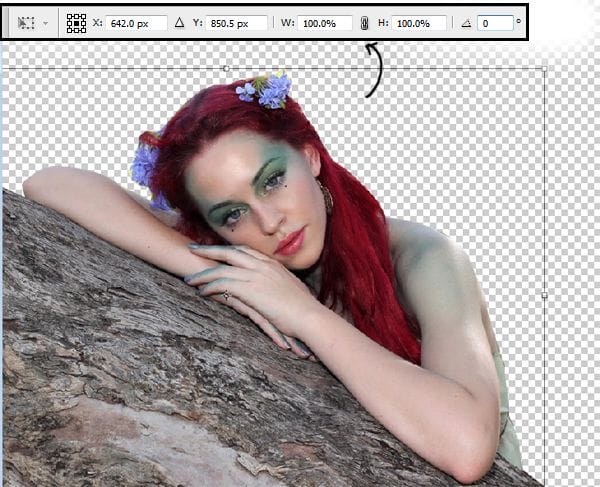
Step 7 – Find a Background
In this case, you can use a forest that doesn’t have too many branches, because the main focus is going to be the model.
Step 8 – Gaussian Blur.
Apply blur to the background. Go to Filter – Blur – Gaussian Blur. Add a radius of 4 pixels.
Step 9- Contrast
Duplicate the background layer, press Ctrl + J. and change the layer color, to do this go to Image – Adjustments – Hue/Saturation or press Ctrl+ U. Press the option colorize and press ok.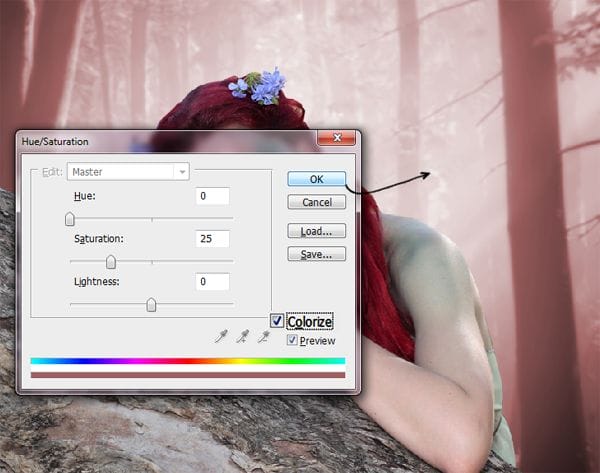
Step 10 – Change layer mode
Now change the layer mode to Soft light. And reduce the opacity to 80%.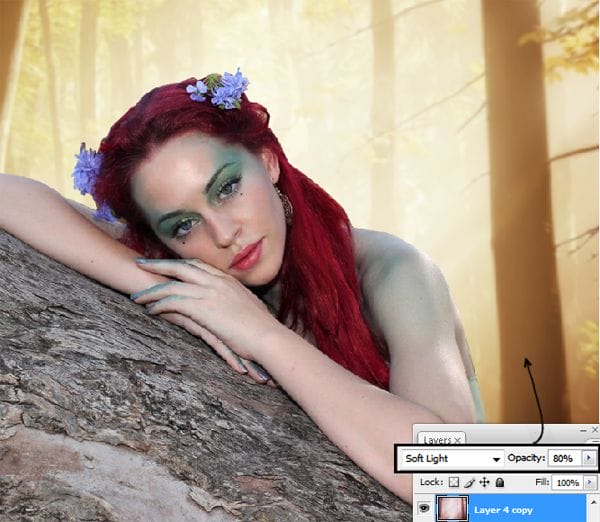
Step 11 – Merge layers.
To merge layers together, right-click in the layer and choose the option to merge down. In this way, you are only going to have one layer of the background.
Step 12 – Model’s Skin
Select the model’s skin with the lasso tool. After you finish the selection press Ctrl+J to duplicate the selection.
Step 13- Reduce Saturation.
Go to Image – Adjustments – Hue/Saturation (Ctrl +U) and in the option Saturation put -35, press ok to save the changes.
Step 14- More Contrast
Duplicate that layer and change the layer mode to Soft light and reduce the opacity to 50%.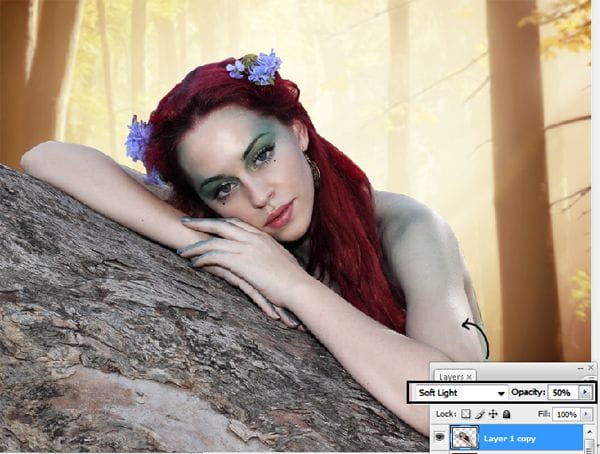
Step 15- Merge the layer
Right-click over the layer and choose the option to merge down.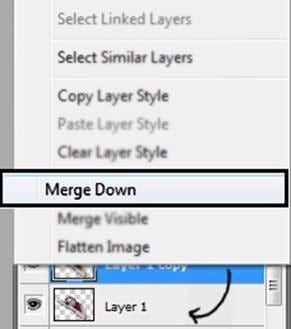
Step 16 – Change skin color.
Duplicate the model’s skin layer pressing Ctrl + J. Then go to Image – Adjustments – Hue/Saturation or press Ctrl + U. Press the option colorize and in Hue put: 22 and in saturation 20.39 responses to “How to Create an Autumn Fairy Photo Manipulation”
-
Ich bin zwar noch nicht ganz fertig und es wird nicht so aussehen wie deines liebe Andrea.
Aber ich liebe solche Tutorials -
Very nice and clear tutorial , Andrea . Thanks for sharing !!! 👍👍👍👍❤😊
-
Hey andrea!
The tutorial is soo amazing!! I Tried creating this autun fairy photo manupilation in photoshop but i’m having a litte problem….The trird step of duplicating the background pressing ctrl+J is not happening so i there any other way to do this???…Hope u can help me!! -
hey andrea!
The tutorial is really awesome but i”m having a little problem…
when i stated doing this autumn fairy manipulation in photoshop..i’m not able the third step i.e duplicate the background pressing ctrl+J..
is there any other way following which i can do it…??? -
i wish you could make a video tutorial
-
just awesome tutorial thank you very much for share this technique .
-
Thanks…this is awesome!
-
Une irritation des m
-
Very nice !
-
Obrigado pelo Tutorial, ficou demais!!
http://marloaugusto.deviantart.com/art/Fairy-by-Marlo-484388939 -
amazing!! great to see the amazing work of great experienced art directors!!Thanks for sharing
-
Thank you for this wonderful composition and tutorial, I loved achieve:
http://cartes-mireilled.eklablog.com/montage-d-une-fee-d-automne-en-musique-a112430168 -
OKey
-
I love it! You’re very creativ!
My version: http://realladypunk.deviantart.com/art/Fairy-479815842?ga_submit_new=10%253A1409666557&ga_type=edit&ga_changes=1&ga_recent=1 -
I was fine till I got to the makeup…then it all went to hell.
-
thanks your work is very appriciable
-
سلام خسته نباشیدخیلی سایت عالی داریداماچون انگلیسی هستش من
یجاهایی به مشکل میخورمونمیتونم جلوبرم خیلی دوستدارم کارایی که به نمایش گذاشتیدویادبگیرم میشه لطف کنیدوبهم کمک کنید -
Thake you
-
ES UN PRECIOSO TUTORIAL APRENDI MUCHAS TECNICAS QUE NO PODIA RECIBE UN FUERTE ABRAZO Y MIS RESPETOS PARA TI
-
Tutorial muito bom. Gostei muito de fazê-lo. Obrigada.
http://vaniapaiva.deviantart.com/art/Autum-Fairy-by-VPaiva-403958498
-
thanks for the tutorial :) helped me learn a heap of new things. Btw you should have a few more steps on how to add the heart as it’s a little confusing on your own.
-
Excellent. Nice one :) now I will create one with my own image :)
-
Me gusta mucho el tutorial, el resultado final es fantástico y está muy bien explicado paso a paso.
Congrtulations -
die link?
-
wow! such guide to step by step tutorial for cool work
thanks man -
Wonderful tutorial, I made a FB cover for friend https://www.facebook.com/photo.php?fbid=459440810783327
-
An excellent tutorial, very clear and a fantastic outcome, thank you very much.
-
creativity never ends and If you guys keep sharing such a great tutorial It will definitely enhance the creativity
-
I have been looking for this.. thank you very much…
http://www.antsmagazine.com -
Beautiful tutorial, thank you :)
http://www.flickr.com/photos/pareeerica/8248380807/-
@pareeerica I’m so glad you found it useful thank you so much for the link
Andrea -
That blog image is very attractive. I like it very much & I read this blog it is very nice. Thanks for the sharing. Keep it up.
-
-
I can not download the background and wings. The link takes to the site, but not the images. I am disappointed because I was really looking forward to this my first manipulation.
-
@JohnBurger That’s the thing about free stocks… they just disappear
I can find some similar ones on DeviantART search here:
http://browse.deviantart.com/resources/stockart/?order=9&q=wings -
@JohnBurger Yes sometimes that happens, but you can try different images and also get the same result.
Andrea
-
-
Great work, thanx
-
@Ferobanjo I’m glad you like it!
-
Woow… Andrea !!! You are one of my favorist teacher. Thank you so so much for sharing your artistic.
-andy
-

Leave a Reply to MarloCancel reply