

Repeat the process several times until you get the desired result.

Step 34 – Freeform Pen tool
Add a new layer (Shift + Ctrl +N) and pick the Freeform pen tool. Make some strokes over the model’s face and cloth.

Step 35 – Brush
Make sure your brush is set with a white soft brush of 2px or 3px cause you are going to use that for the strokes made with the freeform pen tool.

Step 36 – Strokes
Now pick once again the freeform pen tool and press right click, choose the option stroke path on the menu.

Then choose the option Simulate pressure brush and press ok.

Step 37 – Fixing Strokes.
You are going to have the strokes like this:

To fix then pick the blur and the smudge tool to make them softer and to move the shapes to get a better result like this one:

Step 38- Less opacity
Reduce the opacity of the layer to 60%

Step 39 – Light and shadow
Like you did before on the step 19 add two layers one from the lights and the other one for the shadows and paint both with soft round brushes, the lights with white and the shadows with black.
Shadows: Layer Normal mode 50% opacity.

Light 1: Layer Normal mode 50% of opacity.

Light 2: With a small brush paint over the details, use layer in soft light mode.

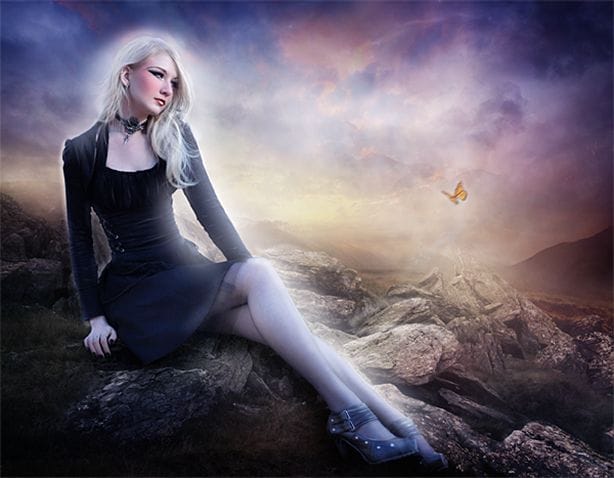
Step 40 – Butterfly.
Add a butterfly to the image and apply the filter motion blur. Go to Filter – Blur – Motion Blur.

Press Motion Blur and use 28 in angle and in distance use 13px.

Step 41 – Color
Add a texture layer and use Gaussian blur to make it softer. Filter – Blur – Gaussian Blur.

Use 100px of radius.

Step 42- Layer Mode
Use soft light mode in that layer.

Step 43 – Lighting
Add a new layer with a stock like this one:

Now apply Gaussian Blur. Filter- Blur – Gaussian Blur. And add 150px radius.

Step 44 – Saturation
Reduce the saturation of the layer press Ctrl+U or go to Image- Adjustments – Hue/Saturation. and in the option saturation put -100.

Step 45 – Layer Mode
Change layer mode to soft light and reduce the opacity to 70%

Final Results
That’s it, hope you have great results using this tutorial.
Tutorial by Andrea Garcia
 Thank you so much for reading this tutorial I hope this is helpful for you all I you want to check more of my art go to www.andygarcia666.deviantart.com
– Andrea García
25 responses to “How to Create This Mystical Scene and Add Makeup to a Girl in Photoshop”
-

Awesome job… This is a well detailed tutorial, I will try it out
-
This is a very interesting tutorial, I love it.
-
I love your tutorials they are fantastic
-
i love it
-
love the fanpage
-
<3handheld power tools ?
-
yep<3
-
-
have nice work….thanks for sharing.
-
im fan of your site. :) :) :)
nice tutorials. helps a lot in learning things -
Hi
I’m a newbie at Photoshop and all I have to say is : Wow.
You’re Tutorial is awesome (Y) -
LOVE IT! :3 i wish i could edit in that way one day… :) thanks for shared it with us :)sorry for my english xD
-
Great tutorial…
May I ask in step 41 – texture, why I can’t find it in resource, could you mind to reupload it? Thanks so much for useful tut..:)-
A.A.
How are you?
Please information to share me ,who can you make this pitchers.I am a Photographer of fashion shoot.
Multan (Pakistan).
-
-
Nice work
-
What is a fractal texture?
-
No link to it in the resources… probably means this:
http://browse.deviantart.com/resources/textures/abstract/?q=fractal
-
-
I love your tuts! Thank you
-
great as before i am a fan of your website.go on
-
The butterfly is a nice touch. The glow… mmm.. it not very natural looking
-
She’s so pretty
-
thanks you for share
-
THaaanks so much for this type of tutorials. I have never used photoshop but today I came to know such great demonstration. Now I am going to learn photoshop …
Thanks Again…
-
The glow around the girl looks more like the halos you see in HDR photos than a glow that’s emitting from the girl. I would make it glow only around the parts where her skin is revealed… so not so much around the hair and none around the arms but only in the parts where her skin is.
Also, I would use a vector mask instead of making a selection and duplicating the layer in step 3.
-
Yeahhhh looks fake and overall amateur tutorial. No usage of layer masks or smart filters. You can do it anyway you like but teach it properly so people don’t end up like you.
-
Ok I agree with some of the things you said but as a whole this tutorial is great! Well explained.
PS: ARIGATO Andrea!!
-
Leave a Reply