This tutorial demonstrates techniques to create Travel Flyer Template Design in Photoshop. This is a fairly straightforward tutorial using Photoshop’s drawing tools and composition techniques. The techniques shown here could be applied to create any other flyer template design as well, like holiday trip, local attraction, etc.
What you’ll be creating
Hereby we are going to create Travel flayer template design in Photoshop. We will start off by preparing the main image, create the multi-layered curvy shape using the shape tools, warp command and add a couple of layer styles to give it a sleek and shiny looks. I have used Photoshop version CS6 to create this work, but any version from CS3 onwards will be fine as well.
Travel Flayer design template – Front side view:

Travel Flayer design template – Back side view:

Tutorial Resources
- Sun Island – by h3nry
- Water Sport – by goodmorph
- Monkey – by Rita
- Shrine Temple – by denzani
- Wayang Puppet – by Rita
- Beach icon Brush – by photoshopfreebrushes
Step 1
Within Photoshop, press Ctrl+N to create a new document. Set the width: 2480 pixels and height: 600 pixels, while the resolution is set to 300 pixels/Inch respectively.

Step 2
Go to File > Place menu. Locate and select sun island image, then click the Place button to insert it as a smart object. Adjust the size and position of the sun island image. Hit Enter to apply the transformation.

Step 3
Repeat the previous step to insert water sport image as smart object. Place it on top of sun island layer.

Step 4
Add layer mask to water sport layer. Within water sport layer mask, draw a black to white linear Gradient diagonally using the Gradient tool.

Step 5
Draw a blue (RGB: #0099c5) rectangle shape using the Rectangle tool. Set the height around 860 pixels.

Step 6
Go to Edit > Transform Path > Warp menu to use the warp command. Drag the warp needles to bend the rectangle’s topside as shown in the image example below.

Step 7
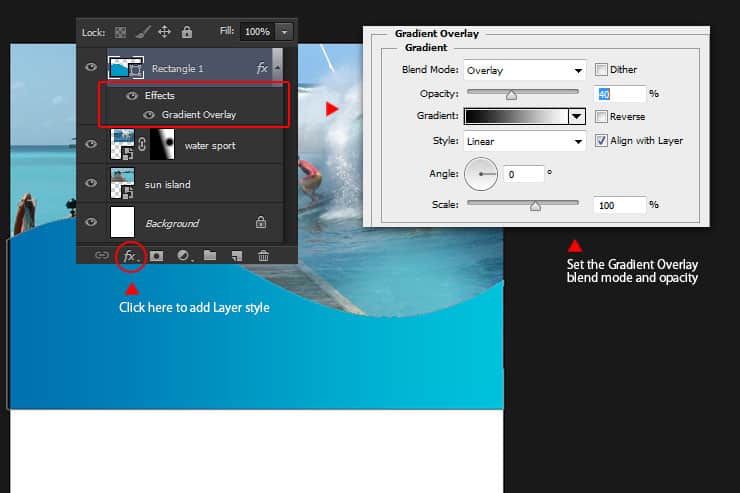
Add layer style Gradient Overlay. Inside the gradient overlay dialog:
- Choose Blend Mode: overlay
- Gradient color is black to white
- Select style: Linear
- Set the Angle: 0
We use this method so if you change current shape’s color into anything else, the gradient effect should still there, regardless what color you choose.
Step 8
Draw another white rectangle shape on top the blue rectangle shape. Recall the transform warp command to bend the white rectangle’s left side.
14 responses to “Create Your Own Travel Brochure Using Only Photoshop”
-

hi every one lol XD ヅ
-
hi every one
-
hey
-
who dis
-
-
legendary Austin
HI I WOULD LIKE TO KNOW HOW TO CREATE A SHAPE ON TOP OF ANOTHER LAYER ON THE TUTORIAL IS NOT CLEAR WHAT TO DO.
Fantastic tutorial. Love your work you are truly talented
ok
This tutorial go against Alaluh,,,, Very not good. You will pay ffore this,,,
-
Day is now,,, ready for achmed you bete
First of all how dare you make this awful tutorial. I just thirty minutes of my life making a gosh darn arrow that’s small /:(
Thanks, very helpful!!!
Hi, Wayang Puppet link takes me to 410-Image Not Available. Do you have another link to the image? Thanks.
-
Sorry, I meant Shrine Temple link takes me to a 410 page.
Leave a Reply