

Step 30
Now create a new layer and make it Clipping mask, then use Brush Tool(B) Soft Round with foreground color Yellow #e3ae48 and start painting. Blend mode change to SoftLight with Opacity 100%.


Step 31
Add Adjustment Layer “Color Balance”

Step 32
Add Adjustment Layer “Curves” and press Ctrl/Cmd + I to invert. Then use Brush Tool(B) Soft Round with foreground color white and paint on Dark parts.
Step 33
Add Adjustment Layer “Curves” and press Ctrl/Cmd + I to invert. Then use Brush Tool(B) Soft Round with foreground color white and paint on Highlight parts.

Step 34
Add Adjustment Layer “Black and White” Opacity set to 25%.

Step 35
Create a new layer and use Brush Too(B) Soft Round with size 2px an Hardness 100%. Foreground color set to black and paint to point A then press and hold Shift key and paint to point B.

Step 36
Create a new layer and use a Brush Tool(B) Soft Round with foreground color white and Size to max(5000px). Then paint to right corner. Opacity set to 36%.

Step 37
When we finished all this, now merge all layers to one. Slecet the last layer and hold CTRL/CMD + SHIFT + ALT + E. Now we have a final layer, right click on mouse and select Convert to Smart Object. Then go to Filter > Camera RAW Filter (Version 2021 CC). At its most basic, the Photoshop Camera Raw filter allows you to use the functions of the ACR interface at any time within Photoshop. This allows you to make any adjustments within ACR at any time during your workflow instead of just limiting its usage to the raw processing stage.While it would be possible to import your working file into Lightroom to make the same sets of adjustments, doing this in Photoshop saves you from that cumbersome step. It allows you the use of these tools without any extra effort.

Step 38
Now in Camera Raw Filter, set the Value: Basic
- Temperature: -6
- Exposure: -0.80
- Contrast: +1
- Highlights: +69
- Shadows: +28
- Whites: +11
- Texture: +11
- Clarity: +14
- Vibrance: +30

Curve
- Highlights: +9

Detail
- Sharpen: +64

HSL Adjustments Hue
- Reds: +9
- Oranges: -14
- Yellows: -56
- Greens: -2
- Aquas: -23
- Blues: -12
- Purples: +10
- Magentas: -17
Saturation
- Reds: +59
- Oranges: +63
- Yellow: -18
- Aquas: +13
- Blues: +14
Luminance
- Oranges: -25
- Yellows: -18
- Greens: -1
- Aquas: -9
- Blues: +11

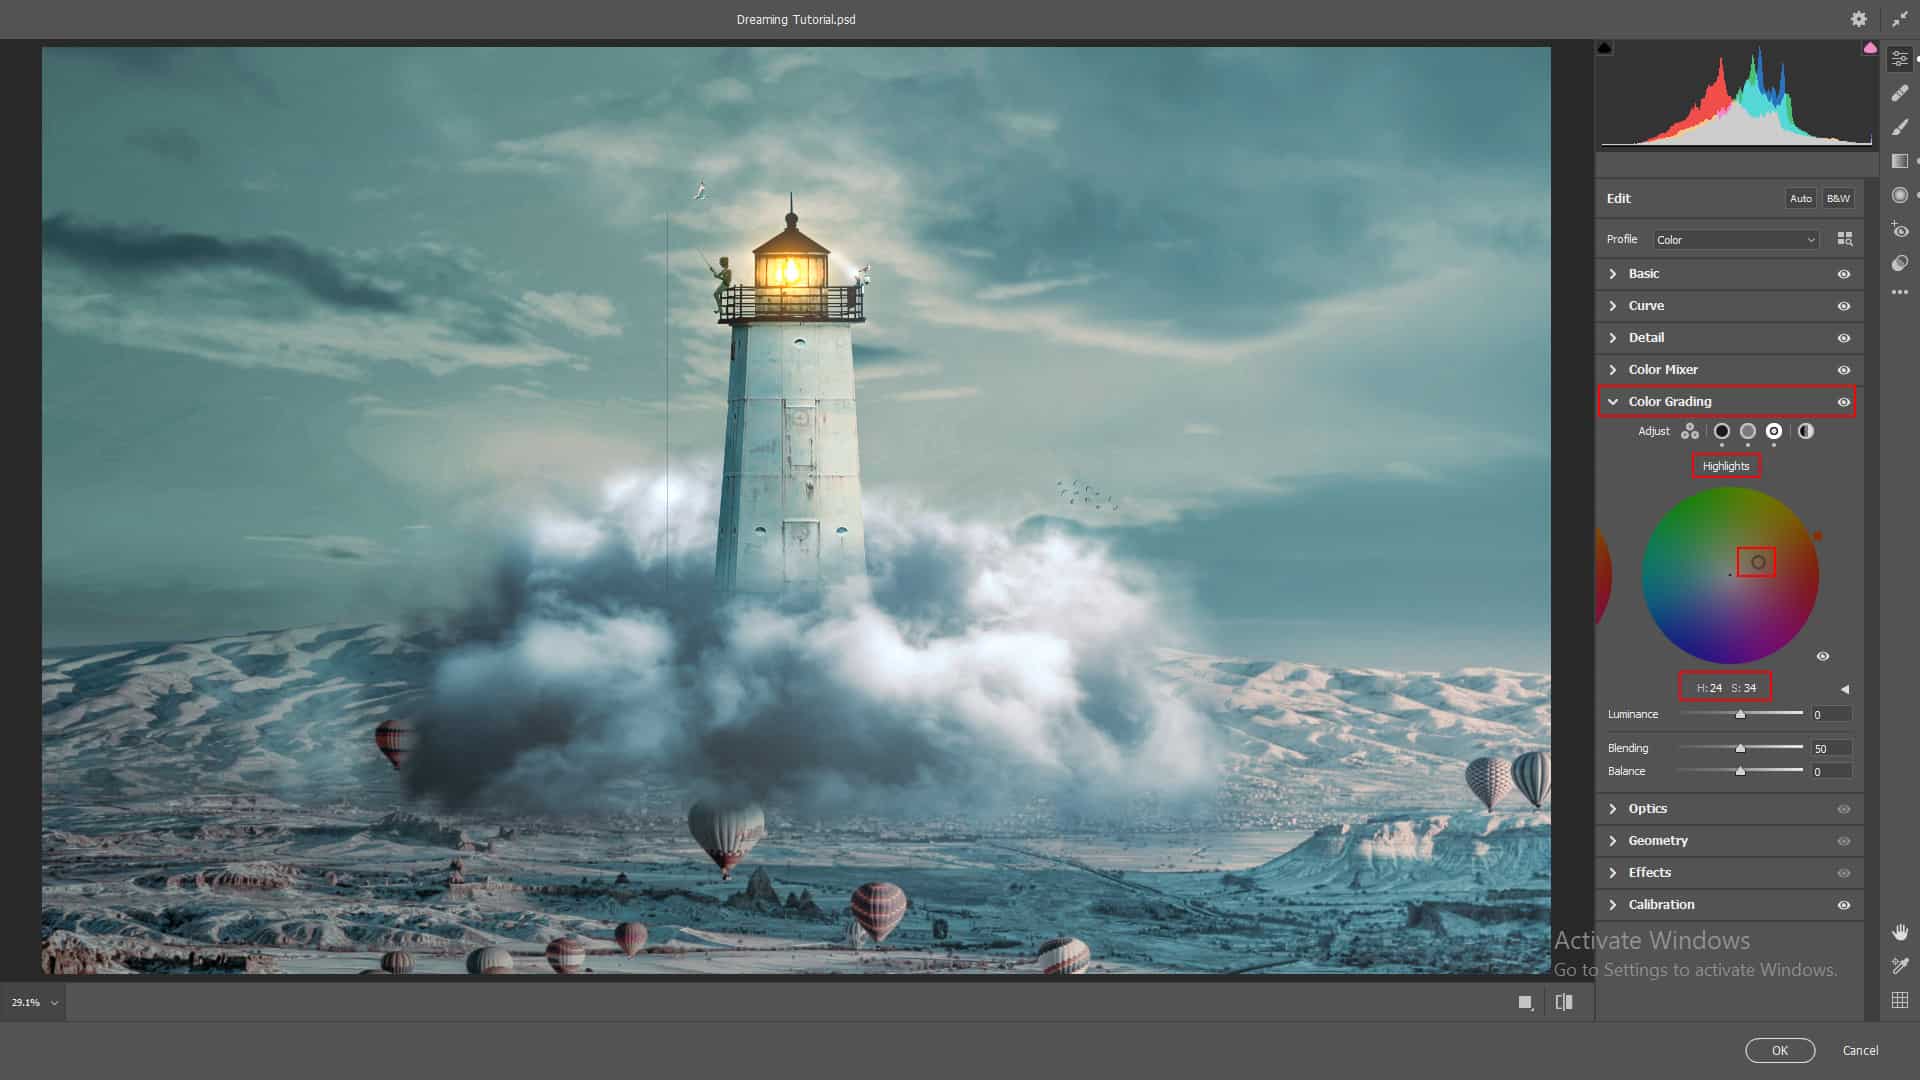
Color Grading
Shadows:
- H: 248 S: 12 Lumiance: +1
Midtones:
- H: 214 S: 29 Lumiance: +1
Highlights:
- H: 24 S: 34


Callibration
- Red Primary:
- Hue: +1
- Saturation: +6
- Blue Primary:
- Hue: -18
- Saturation: +24

Gradulated Filter
- Exposure: +0.40
- Highlights: +14

Gradulated Filter
- Exposure: -0.30
- Highlights: -24
- Blacks: -25

And finally, everything should look like this.

Final Results

Download the PSD
3 responses to “Create a Light House on Cloud Photomanipulation Tutorial”
-

Thank you very much for this great Tutorial!
Unfortunately for now some of the single step images are not accessible; especially the ones showing which parts of the image should be masked. But this I cannot blame on you, that’s a thing of the website.
With the PSD atached, it was no problem to get a clue what has been masked and how it has been done.But there is one thing, you could improve and what, I guess not only me would appreciate: I know, the “Camera Raw” filter is a really complex thing. But for now, I’m just copying the values and shout out a “Heureka!” when it looks like your result.
Some explanation why it is something done there and what is the impact would be very helpful.Anyway! Great work and thank you for sharing! :)
-
Thanks for informing us! The images are fixed now.
-
-
Nice tutorial.
Leave a Reply