

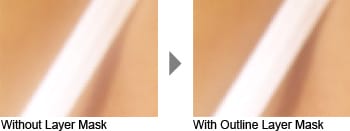
Step 10
Apply a Find Edges filter (Filter> Stylize> Find Edges).

Step 11
Use the Zoom tool (Z) and zoom in around 300-400% to an a edge. If you look closely at your image, you may be able to notice a thin black outline on the edges. The line is caused by the Find Edges filter.
Step 12
To remove the outline, we’ll simply blur the layer mask with the Find Edges filter applied just a tiny bit. Open the Gaussian Blur filter tool (Filter> Blur> Gaussian Blur), set the radius to 3 pixels and click OK.

Step 13
Hold shift and click on the thumbnail of the top layer mask to view the image without the layer mask and undo to revert. You’ll notice that the layer mask increases sharpness but reduced the diffusion glow effect. If you want to keep the diffusion glow effect, simply disable the layer mask by holding the Shift key and clicking on the thumbnail of the top layer mask.
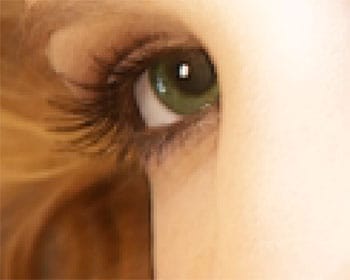
Final Results

3 responses to “Diffusion”
-

Thank u so much
-
Good but it’s overly strong and fake. It would look better if you had it at 30-50% opacity.
-
woow thank you so much great tutorial and easy steps. Can i add your this tutorial to my blog
Leave a Reply