Everyone’s trying to mimic this popular Photography trend of grungy photos of old or homeless people. Find out the secret Photoshop technique that makes wrinkles look dramatic and sculptured.
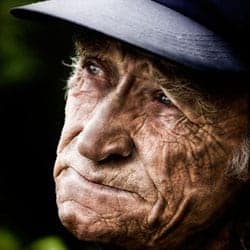
Preview of Final Results

Step 1: Open a photo
Begin by opening a portrait of someone with wrinkles. This effect will also work on photos of younger people with smoother skin as well but this photo effect works best on wrinkles. To open an image, choose File > Open, browse for the image and click Ok.

Making the colors look grungy
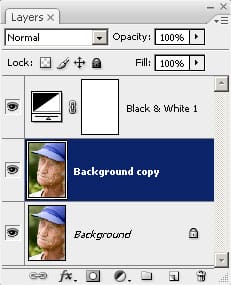
Step 2: Add a Black and White or Hue/Saturation adjustment layer
First, we’ll alter the color so that it matches the moody effect of wrinkled skin. To do this, we’ll be adding a Black and White adjustment layer. Click on the New Adjustment Layer button in the layers palette

Choose Black & White. If you don’t have Black & White or if you’re using Photoshop CS2 or older, select Hue/Saturation instead.

The Black and White tool will appear. Simply click OK with the default settings. If you are using Photoshop CS2 or older and added a Hue/Saturation adjustment layer instead, simply reduce the saturation to -100 and click OK.

Step 3: Blend the layer
Now that we have the adjustment layer, we’ll need to make it blend into the image to restore the color. For this, we can simply change the blending mode to Overlay. In the Layers palette, click on the drop down menu and select Overlay.

Now your image should have a nice harsh lighting effect.

The secret technique for ultra-dramatic wrinkles
Now that we’re done working on the color, here’s the secret to making wrinkles look ultra-dramatic. The filter to use for this technique is the Plastic Wrap filter. How does that work? Follow the rest of the tutorial to find out.
Step 4: Duplicate the Background layer
In the Layers palette, select back the Background layer.

Press Ctrl+J to create a duplicate of the layer. You should now have two layer with the new layer called Background copy.
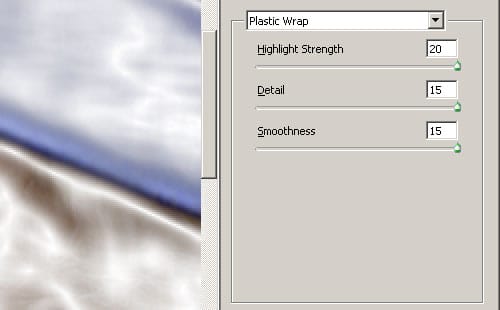
Step 5: Apply a Plastic Wrap filter
Now we’ll apply the Plastic Wrap filter. Choose Filter > Artistic > Plastic Wrap.

In the Plastic Wrap window, use the settings from the screenshot below:
Step 6: Change the blending mode
To make this layer blend, we’ll use the Multiply blending mode. This will darken the skin to make it look dark and grungy. From the drop down menu in the Layers palette, select Multiply and you should get an effect like the image below.
22 responses to “Dramatic Wrinkles”
-

it googe
-
What do you do instead of plastic wrap with cs6
-
it was terrible
-
Good Tutorial if a little dull. Try using people other then White People. I used it on a picture of an old Chinese man it it was Awesome,.
-
I thought it was a good tutorial. If you do it with a serious looking picture of Morgan Freeman it is like badass.
-
This is actually what I was searching and it is awesome.
-
I think this whole thing is retarded
-
makes me crazy
-
His wrinkles are so hot! I could lick them all day.
-
Thank you. This is very very useful tutorial.
-
hateit
-
love this thank you
-
this is a beautful peice of work. I love the way the wrinkles grew and became more unique. i need this you see for my photos as i am catfishing at the moment, pretending to be a 60 year old woman. so many thanks Ariane Wilson.
-
This was a good tutorial, but to make it look more natural, I increased the hardness of my eraser to about 20-30% and erased the entire picture. But it was an overall good tutorial.
-
very good
-
good thought! but the effect would be too strong, u should adjust some setting to make it looks nature
-
Natural not nature
-
-
nice…… tuts……
-
i dont understand this at all
-
great good luck to u
-
Awesome! Fantastic tutorial! :)
Leave a Reply