
Step 31
Set the Layer’s Blending Mode to Multiply. Use the Transform Tool (Ctrl + T) to resize the image to 41%, rotate the image 90 degrees anti-clockwise and right click select Flip Horizontal. Then rotate the image a bit to the right at an angle of 4.8 degrees such that the blue drip is aligned with the orange drip.

Step 32
Extract unwanted part of the watercolor through the Layer Mask technique until you achieve a similar result as below.

Step 33
Add some green splatters to represent leaves. Make another selection from the watercolor stock, see below. Paste it into a New Layer “watercolor4”.

Step 34
Resize “watercolor4” by 50% and position it. Change the layer’s blending mode to Multiply. Remove the watercolor spots on her arm through the Layer Mask technique.


Step 35
Add a big blotch of paint to represent a tree. Make selection as below. Copy and Paste it into a New Layer “watercolor5”.

Step 36
Change the layer’s blending mode to Multiply.


Step 37
Lastly add a little splash of orange. Copy part of the orange drip (see below) and paste it (see below) into a New Layer “watercolor6”.

Step 38
Use the Layer Mask technique to remove the sharp edge on top of the splash.

Step 39
Finish off by adding your brand or signature. Ctrl + T to Rotate the text to follow the slope of the branch.

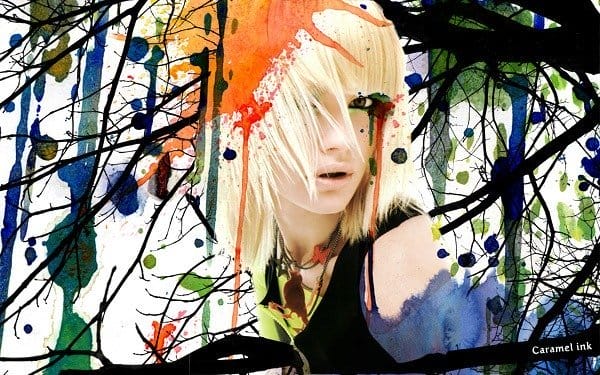
Final Version
I hope you’ve enjoyed this tutorial. View the original size here. Looking forward to your comments, ideas and versions of what you’ve learned here. Cheers!
![watercolor-caramelink[1]](https://cdn.photoshoptutorials.ws/images/stories/FashionWatercolorArtwork_3192/watercolorcaramelink1.jpg?strip=all&lossy=1&webp=82&avif=82&resize=600%2C375&ssl=1 "watercolor-caramelink[1]")
Download the PSD
Watercolor Fashion.psd | 28 MB
Download from Website
Leave a Reply