

Step 5: Adjust the Black and White adjustment layer settings (For Photoshop CS3 only)
Photoshop CS2 or Older:
Skip this step
Photoshop CS3
In the previous step, we skipped the settings to change the layer blending mode. Now, we’ll go back and edit the settings that we previously skipped. The reason for this is so that we can see the live preview effect of the Black and White adjustment layer with Overlay blending mode instead of the Normal blending mode.
Double-click on the Black and White adjustment layer and a Black and White window will appear. In this window, adjust the settings to get the results you desire. Start by scrolling through the Presets and find the one that closely matches your

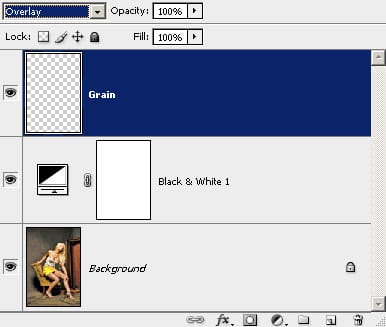
Step 6: Create a new layer named “Grain”
Choose Layer> New Layer or press Ctrl+Shift+N. Type in “Grain” (without the quotations) as the layer name and select Overlay as the blending mode. We will use this layer to add noise to the image.
Step 7: Add a 50% gray fill
Select the Grain layer that we created in the previous step. Then, press Ctrl+Backspace to access the Fill tool. In the Fill tool, select 50% Gray in the Use drop down menu and click OK. This will fill the layer with 50% gray.

The reason we’re using 50% gray is because it will not be visible on many layer blending modes including Overlay. This means that the gray will not be visible on our Grain layer because it’s using Overlay as the blending mode. So why did we do this if it does nothing?
Some filters including the Add Noise filter we’ll be using in the next step won’t work on an empty layer. In order to use it, we had to fill the layer with 50% gray and change the blending mode to one of the blending modes that won’t show the 50% gray.
Step 8: Add Noise
Choose Filter> Noise> Add Noise. In the Add Noise tool, checkmark Monochromatic and click OK.

Step 9: Blur the noise
Choose Filter> Blur> Gaussian Blur and enter 0.3 in the Radius setting then click OK.

Step 10: Increase the contrast of the layer with Auto Levels
Choose Image> Adjustments> Auto Levels. This will increase the contrast of the layer making the noise extremely visible. Reduce the opacity of the layer until you get the noise level you desire.


Final Results
Original Image

Gritty HDR

4 responses to “Gritty HDR”
-

SICK MATE !!!!
-
useful tutorials…
-
nice
-
taik upo
Leave a Reply