
Right click on the layer then choose Blending Options.

In the Blending Options, move the black input slider to the middle like shown in the image below. As you move the input slider, the number on the This Layer property will change. You can tell when it is in the middle when this number is 127.

While holding down the Alt key on your keyboard, click and drag the black input slider towards the very right like shown in the image below. Click OK.
![animation[3]](https://cdn.photoshoptutorials.ws/images/stories/Hipster-Photo-Effect_131F/animation3.gif?strip=all&lossy=1&webp=82&avif=82&w=1920&ssl=1 "animation[3]")
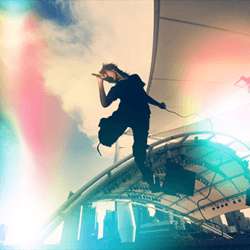
Here’s what the image looks like now. What we just did in the blending options made the layer visible according to the brightness of the layer. This means that the bloom effect is only visible in the brighter areas of the photo.

We still have the bloom effect, it just looks much more natural now.

Step 4
We got the bloom effect so now we are going to add an effect gives the photo a low dynamic range look. Start by adding a Black & White adjustment layer (Layer > New Adjustment Layer > Black & White. Don’t worry about the settings, we’ll change this later.

Change the blending mode of the Black & White layer to Overlay.

In the Adjustments palette (Window > Adjustments), you can change the settings of the black and white layer. The Auto button works pretty well for getting good results.

Now we have this lo-fi look which some people say is great while others say it’s ugly. Don’t worry too much about the results right now because in the next step, your image will look completely different. Also, because we’re working on an adjustment layer, you can change the settings anytime you like.

Step 5
Now we are going to add a retro color effect to the photo. Start by adding a Color Fill adjustment layer (Layer > New Fill Layer > Solid Color). A window will appear asking you to select a color. Don’t worry about the color for now; just click OK. Change the blending mode of the layer to Exclusion then reduce the opacity to 25%.

Double click on the Color Fill layer to edit the settings.

Pick any color you like. You can get a lot of different color effects depending on the color you pick. The most popular color people use is #007fff.
7 responses to “How to Make Your Photos Look Hipster with Photoshop”
-

Simply sunning. Well written, well explained, and your Lomo Lightning file is perfect. Thank you so much.
-
this is a great tutorial! very descriptive and easy. love it!
-
nice,,,,,,,,,,but
if-u-give-in-pdf-file-then-it-will-help-us-moreeeeeeeeeeee -
Doesn’t look hipster to me. Sorry.
Hipster photo treatment is making a photo look like it was captured by analog film camera. To do so it is better to use film presets for lightroom -
Hi,
I have a problem when i place my light.
The thing is, i want to mold it to something, i don’t want that square when i place and select screen mode.M.
-
your page has been my fovorite. thank you for the step by step easy instructions!!!
-
very nice thanks :)
Leave a Reply