

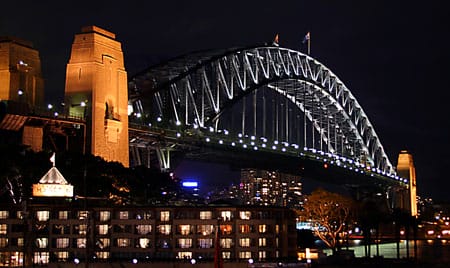
Final Results of Star Filter Photoshop Tutorial
Original Image
Star Filter Photoshop Tutorial

8 responses to “Star Filter”
-

I use this tutorial all the time in my airplane photography, particularly to highlight the beacons. My only issue is that sometimes the rays are a bit thick. What I do, is to to the individual offending highlight and 1.) black out a significant portion of the highlight which allows for sharper, more realistic rays, and 2.) Make sure the the highlight is the color I want. Aircraft beacons flash red, BUT the core is yellow, so I will paint the core in the color (red in this case) I want the rays to be. When you SCREEN all the layers you don’t lose the yellow core of the beacon, but the rays will be red! I also use it for street lights, and other highlights that may have two or more colors!
I MAY have an idea for the rainbow (laser etched) effect
-
Can you share your idea for the rainbow/laser effect?
I add a rainbow gradient and clip it to the flare layers to give it a holographic look but I have troubles making the flares thin without going in by hand and shrinking every large blob.
-
-
how can you give off a gradient effect to the star? like a rainbow
-
I just tried this out and it works perfectly! Thank you!
-
In step 7, there is no Auto Adjust in Image>Adjustments. Perhaps you meant in Levels?
I was unable to see any change when doing step 6 thus was unable to adjust the size of the star. I had to reach step 7 and use Levels>Auto Adjust before I could see the radiants.
After finishing my star bursts were blunt, not tapered to a point like yours.
-
Yes sorry this might have been removed in an update.
You can use Levels and click on the auto adjustment or just press Shift+Ctrl/Cmd+L.
If it’s not as tapered, make sure you’ve applied the motion blur several times. If you only do it once, it won’t have the sharp pointy edge.
Hope this helps!
-
-
^^
-
nice
Leave a Reply