
When you’re done transforming, you may increase the Opacity by 30% making it 70%. Now, we will be blending our Water stock image with the ceiling. Activate the Burn tool (O) because we would need this to darken some regions of the water ceiling.

Input the following settings for our Burn tool (O).
- Brush size: 500 px
- Hardness: 0%
- Range: Midtones
- Exposure: 25%

Next, we will be erasing the edges of our “water ceiling” to make the blending more seamless. Activate the Eraser tool (E) and use the following settings:
- Brush size: 125 px
- Hardness: 0%
- Opacity: 25%
- Flow: 100%

Finally, let’s change its color tone. While the “water ceiling” layer is selected, press Ctrl/Cmd + B to adjust the Color Balance of the selected layer and then input the following values:
- Color Balance: -40, 0, -36
- Tone Balance: Midtones
- Preserve Luminosity: Checked
Next let’s create an effect similar to how our eyes work when it is open underwater. To do this, let’s activate the Rectangle tool (U).

Before creating a rectangle, let’s set its color. Click on the Color Picker square located on the tools menu and input the following on the “#” box.
- #: 3bd2ed

With the Rectangle tool activated and the color set, let’s create the rectangle.

After that, let’s rename the layer to “haze 1”. Let’s create another rectangle because we would need to darken the area on the top. Activate the Rectangle tool (U) and use the following color settings:
- #: 4a7675

After that right click on the layer to bring up the contextual menu and when the menu pops up, click on Rasterize. We will need to do this to make the layer available for editing or so we could apply filters to this layer. Now that the layer has been Rasterized, go to Filter > Blur > Motion Blur from the Menu bar and input the following settings:
- Angle: 90’
- Distance: 400 px
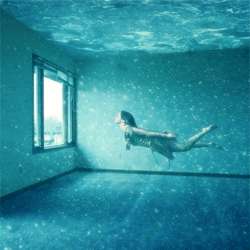
Our image should now be similar to this:

We’ve filled up the ceiling with water, we’ve changed the color tone of the room and now we’ll need to change our floor. Let’s open Calm Water stwberrystk; activate the Marquee tool (M) and left-click and drag a selection area around the ocean and drag that region to our canvas using the Move tool (V). After it has been moved to our canvas, rename that layer to “water floor”.

Now let’s activate the Transform tool (Ctrl/Cmd + T) because we would need the help of our Distort tool to fit our Calm Water stwberrystk stock image into the floor. With the Distort tool activated, move the squares to fit the floor. Once again, so you won’t have a hard time transforming the stock image, reduce its Opacity to 50%. See image below:
8 responses to “Breathtaking Underwater Apartment Photo Manipulation”
-

Are these even real?
-
Such a great concept! It is like a dream.
-
HI the bubbles stock is missing can you fix?
-
OMG I DID THIS AND IT WAS AMAZING THANKS DUDE AND YES THIS IS CAPS LOCK WORTHY!! YOU ROCK :-)
-
FINALLY AN UNDERSTANDABLE TUTORIAL FOR A VERY BRAND NEWBIE LIKE ME. THANK YOU SOOOOOO MUCH!
-
do you have the aquarium picture left still cuz erm its not on the website anymore!
-
i don’t get the point of a single page if i still have to go trough the others pages
-
Just click to “Older Entries”
-
Leave a Reply