
Next, change its Blending mode to Soft Light and its Opacity to 50%. We’ll also need to change its color tone to blend with the rest of the images; with the “water floor” layer selected, hit Ctrl + B to adjust the Color Balance and input the settings below:
- Color Balance: 0, 0, +45
- Tone Balance: Midtones
- Preserve Luminosity: Checked
Let’s check and see how the image looks right now:

Before we proceed to the next step, let’s group the layers that we’ve created. To create a group, select all the layers that we’ve just made and press Ctrl/Cmd + G. Notice that by doing this all the layers will be hidden, you may unhide it by clicking on the “Play” button located to the left of the “Folder” icon of the new group. You may now rename the group, I recommend renaming it the “Water room” but you can use any name you wish. You may also press the Create New Group button located on the bottom of the Layer window, which is in between the Create New Fill layer/Adjustment layer button and the Create New Layer button.

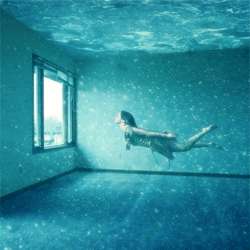
STEP 3 – Insert the Lady in the Water
What we’re going to do on this step is that we would be inserting a lady who is swimming in the water room. Now let’s open the Fairy S – 15 stock image. Let’s activate the Magnetic Lasso tool (L); we will be using this tool to cut the fairy from the rest of the image and move it to our canvas.


After drawing a selection area around the lady, you can now move it to our canvas. Drag it to our canvas using the Move tool (V) and then rename the layer to “lady in the water”.

Now that the “lady in the water” is in place, let’s change her color tone to make her blend in. With the “lady in the water” layer selected, press Ctrl/Cmd + B to activate the Color Balance adjustment tool and input all the values below on their respective fields:
- 1. Color Balance: -90, 0, +26
- 1. Tone Balance: Midtones
- 1. Preserve Luminosity: Checked
- 2. Color Balance: -60, 0, 0
- 2. Tone Balance: Shadows
- 2. Preserve Luminosity: Checked
- 3. Color Balance: -10, 0, +15
- 3. Tone Balance: Highlights
- 3. Preserve Luminosity: Checked
Now after you’ve done that, let’s change the Brightness/Contrast of the lady’s layer. To change adjust the Brightness/Contrast, go to Image > Adjustments > Brightness/Contrast located on the Menu bar. Input the following settings when the B/C box opens:
- Brightness: +12
- Contrast: -10
Due to the increased brightness, we can hardly see the lady’s face, so a good thing to do is to Burn her face! Yes, we will use the Burn tool (O) to darken the light on her face. Activate the Burn tool (O) and use the following settings:
8 responses to “Breathtaking Underwater Apartment Photo Manipulation”
-

Are these even real?
-
Such a great concept! It is like a dream.
-
HI the bubbles stock is missing can you fix?
-
OMG I DID THIS AND IT WAS AMAZING THANKS DUDE AND YES THIS IS CAPS LOCK WORTHY!! YOU ROCK :-)
-
FINALLY AN UNDERSTANDABLE TUTORIAL FOR A VERY BRAND NEWBIE LIKE ME. THANK YOU SOOOOOO MUCH!
-
do you have the aquarium picture left still cuz erm its not on the website anymore!
-
i don’t get the point of a single page if i still have to go trough the others pages
-
Just click to “Older Entries”
-
Leave a Reply