- Brush size: 500 px
- Hardness: 0%
- Range: Midtones
- Exposure: 15%
Note: To be accurate in Burning, change the zoom level to 50% or more in the Navigator window.

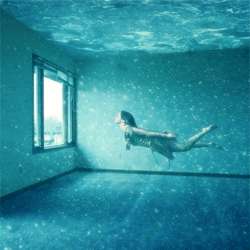
Finally, reduce her Opacity to 70%. The image should be now similar to this:

Step 4 – Create the bubbles
In this step we would be adding the water bubbles to add a realistic water texture and atmosphere to our image. Let’s open the Aquarium Bubbles stock and drag it to our canvas using the Move tool (V) and then rename the layer to “water texture 1”.. Upon moving it to our canvas we would need to transform it appropriately for composition purposes. Activate the Transform tool (Ctrl/Cmd + T) and resize the image. See image below:

Now we would need to remove some bubbles that would potentially ruin our composition. To do that, activate the Healing Brush tool (J). Once again, remember to left-click and hold to bring up the menu in case the Healing Brush isn’t the default button on the toolbar. Using the Healing Brush tool (J) is similar to the Clone Stamp tool (S) but in this case, it doesn’t exactly clone a part of the image, but instead it chooses a source point and then it heals the region and therefore replaces and mixes the pixels which you Alt/Opt clicked on earlier. So activate the Healing Brush and follow the image below:

After that, we would need to erase a distracting part of our “water texture 1” layer. Activate your Eraser tool (E) and use the settings below:
- Brush size: 500 px
- Hardness: 0%
- Opacity: 100%
- Flow: 100%

Now that that’s done, let’s change the layer’s Blending mode to Soft Light, and its Opacity to 60%. If you’d notice, that texture alone isn’t enough so we would need more than one texture to get the right feel for this image. Click on our “water texture 1” layer and press Ctrl/Cmd + J to duplicate it. Once duplicated, rename the layer to “water texture 2” and change its Blending mode to Overlay and the Opacity to 20%. The result should be similar to the image below:

Step 5 – Retouch the whole image
Now on this step, we would be doing all the necessary adjustments to improve the look and feel of the whole image. First, let’s adjust the Hue/Saturation of our image, to smoothen the impact of our image to our viewer’s eye. Click on the Create new Fill layer/Adjustment layer button which is located beside the Create New Group button on the Layer window. When the menu opens, click on Hue/Saturation. A box will open and when it does, use the following settings:
8 responses to “Breathtaking Underwater Apartment Photo Manipulation”
-

Are these even real?
-
Such a great concept! It is like a dream.
-
HI the bubbles stock is missing can you fix?
-
OMG I DID THIS AND IT WAS AMAZING THANKS DUDE AND YES THIS IS CAPS LOCK WORTHY!! YOU ROCK :-)
-
FINALLY AN UNDERSTANDABLE TUTORIAL FOR A VERY BRAND NEWBIE LIKE ME. THANK YOU SOOOOOO MUCH!
-
do you have the aquarium picture left still cuz erm its not on the website anymore!
-
i don’t get the point of a single page if i still have to go trough the others pages
-
Just click to “Older Entries”
-
Leave a Reply