- Edit: Master
- Hue/Saturation
- Hue: 0
- Saturation: -20
- Lightness: 0
Next, let’s create a Solid Color adjustment layer from the Create new Fill layer/Adjustment layer button. When it opens, input the following:
- #: 000223
Then change its Blending mode to Exclusion and set its Opacity to 40%. After that, let’s create a Levels adjustment layer. Input the following settings when it opens:
- Channel: Red
- Input levels: 15, 1.00, 255
- Output levels: 0, 255
- Channel: Blue
- Input levels: 15, 1.00, 255
- Output levels: 0, 255
Now let’s create another color adjustment through the use of a Photo Filter adjustment layer. Use the following settings:
- Filter: Sepia
- Density: 25%
- Preserve Luminosity: Checked
Next, we’ll make use of a Curves adjustment layer. Input the following values on their respective fields:
- Input: 132
- Output: 121

Next, let’s utilize another Solid Color adjustment layer. Input the following value on the “#” box:
- #: a3e2ff
Then change its Blending mode to Color Burn and its Opacity to 60%. Finally, let’s add a Gradient Map filter still through the Create new Fill layer/Adjustment layer button. Let’s utilize the default gradients; pick the Black and white gradient.

Now that we’re almost done, go to File > Save as… and save the image as a PSD file so you may access the whole image with its layers, in the future if you deem to make some changes.
Step 6 – Give the image a dreamy atmosphere
In this step, we would be making the image look soft and dreamy, therefore, making it look magical. To be able to do that, we would need to flatten the layers. To flatten, right click on any layer and pick Flatten Image from the contextual menu. Now we’re ready to do this step. While the image is selected, go to Filter > Blur > Gaussian Blur and input the following value:
- Radius: 16.0 px
The image is blurry, now is this the dreamy atmosphere that we want to achieve? No. To make it dreamy, change its Blending mode to Lighten and its Opacity to 60%.
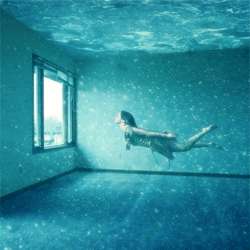
Final Results
")
8 responses to “Breathtaking Underwater Apartment Photo Manipulation”
-

Are these even real?
-
Such a great concept! It is like a dream.
-
HI the bubbles stock is missing can you fix?
-
OMG I DID THIS AND IT WAS AMAZING THANKS DUDE AND YES THIS IS CAPS LOCK WORTHY!! YOU ROCK :-)
-
FINALLY AN UNDERSTANDABLE TUTORIAL FOR A VERY BRAND NEWBIE LIKE ME. THANK YOU SOOOOOO MUCH!
-
do you have the aquarium picture left still cuz erm its not on the website anymore!
-
i don’t get the point of a single page if i still have to go trough the others pages
-
Just click to “Older Entries”
-
Leave a Reply