

The only difference it’s the shadow on the right arm. To make this shadow just need to make double click over the root layer and the layer style menu will be open (or choose Layer > Layer Style > Drop Shadow). Select Drop Shadow and then use the arrow to move the shadow with freedom. When you have putted the shadow in the correct place just use the opacity bar in the drop shadow menu to add more or less intensity.

Step 6 – Ground and grass
Now we’re going to add the ground. The first picture used it’s a simple ground with sand taken from a photo of a beach.
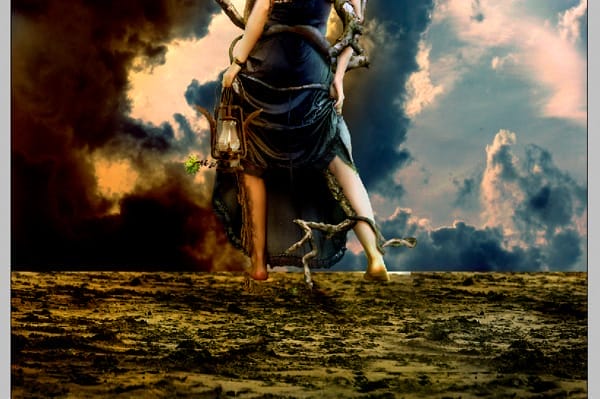
The grass is taken from different photographs. First, create a new layer for the grass and position it behind low the layer with the model. Select and cut different parts of grass then mix them to create a field of grass like the image below.

This layer with the grass should be positioned between the layer with the model and the layer with the ground. Create a new layer and position it above the layer with the model and add some grass to cover the back of the models feet.

Finally, carefully add some grass and stone over the edge of the grass and the ground to hide the hard edges. It’s important that you inspect the edges thoroughly to hide any imperfections.

Step 7 – Add more roots
Now we’re going to add roots and flowers in the close-up. If you have read all the previous steps, you’ll have no trouble doing this. As mentioned before, it is very important that you choose good photos to work with. The photos should be high quality and in focus from foreground to background. If you use low resolution images, the finished results will look poor.
With this in mind, use a variety of photographs of flowers, roots, and trunks. Cut them out carefully with the lasso or quick mask tool and paste in the photo manipulation. Use the same coloring technique with the color balance tool (Image > Adjustments > Color Balance) that we used several times earlier.

To complete the blending of these images, we’re going to add to the ground. There are two ways to do this:
- This is the one that I explained at the end of step 5. Using the drop shadow in the layer style menu (Layer > Layer Style > Drop Shadow).
- Selecting the layer with the ground and using the burn tool in the areas where the shadows fall.
Step 8 – Dust
Now we are going to create some dust next to the feet of the girl. Use a picture with a cloudy sky then select one cloud using the lasso tool.
32 responses to “Combine Photo Elements to Create a Surreal Photo Manipulation”
-

Hi. Where are the stock photos? There are broken images too
-
HI. are there any assets to go with this tutorial please, i don’t see them anywhere. I love doing your tutorials they turnout so good. David Holmes
-
Unfortunately the author didn’t provide any assets to this tutorial but you can typically find photos of the trees/roots/skies easily. For the model you can find lots over at DeviantART: http://www.deviantart.com/browse/all/resources/stockart/model/
-
-
Rally good, Amazing
-
That was an aweosome job! Congratulations!
-
Francesca Lelli
-
Muy bueno !
-
Pls i need the link of those pictures i’m practising digital arts
-
no point doing this tutorial without the sources
-
niccccccccccc
-
good
-
yeay so good
-
great tutorial
-
Wow so amazing,napakagaling po talaga,fantastic what a tutorial!!it helps me a lot i was so amazed!!
-
People should put nicer coments on this because I do not think they would like their work called crap or sloppy.
-
This looks AWSOME! It might be a little hard but I think I can do it.
-
Agreed.. the tutorial is quite crappy, not enough info for beginners, and more advanced users will know all that already.
Also extremely sloppy work on the picture, I wouldnt dare to view it in higher resolution.
-
Badly explained or for advanced people only (which wouldn’t need it). Also extremely sloppy work at the bottom (grass).
I guess this picture looks extremely crappy in a decent resolution. -
hahahahahahaha dats impressive work kip it up.
-
where are the photos that you used
-
yes!, there are not photos ! :/
-
Find your own pictures (;
-
-
不错,如果能提供素材看更好啦。
-
Pretty shitty explained… When I use the magic wand tool it always only selects little parts of the model, and I also don´t absolutely don`t know where to save this, or what happened to the layers I worked on before… And where the hell is the add layer mask button??
-
You should probably get acquainted with basic Photoshop tools first…
The tutorial is very well done, thank you.
-
-
waoooooo very nice
-
mind blowingggggggg………
-
bravo. beautiful end result
-
Can you please give the source for the model and sky picture?
-
great tutorial
-
excelente :P
Leave a Reply