Step 47
Almost there!!! Create new layer and Call this layer Apply Image. now Apply the following settings: Image > Apply Image. don’t change anything just Click Ok.


Step 48
Remove the Color From Layer with CTRL+SHIFT+U or Apply following settings Image > Adjustments > Desaturate.

Step 49
Change Mode to Soft Light and Opacity to 50%.

Step 50
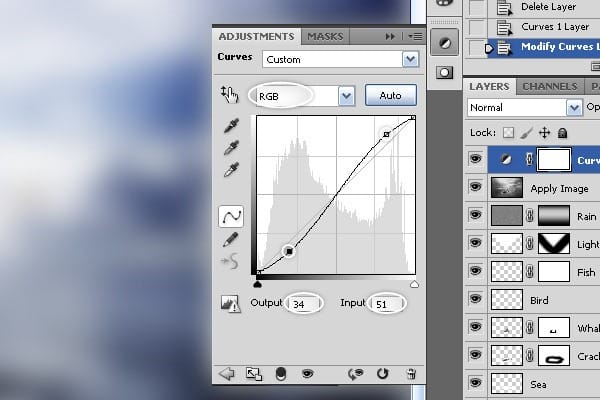
It’s time to add some effect with the Curves.

Step 51
Apply following settings RGB | Red | Green | Blue.


Step 52
We will have this Result afterwords!

Step 53
Create new layer and Call this layer Apply_Image_01 now Apply the following settings: Image > Apply Image. change the Channel: RGB to Blue.


Step 54
Change Mode to Soft Light and the Opacity to 25%.


Final Results
As difficult as it looks I’m very sure if you follow my tutorial you will find a lot of help using your skills and images to produce your own creation! Ones again Thank you for using our tutorial, we will be very happy to answer any questions that you may have, You can simply leave a feedback and or a comment bellow.
![final-results[1] final-results[1]](https://cdn.photoshoptutorials.ws/images/stories/cb37ce03e1fe_31C8/final-results1.png?strip=all&lossy=1&webp=82&avif=82&w=1920&ssl=1)
Download the PSD
Hungry Whale.zip | 26.6 MB
Authors Comment
3 responses to “Create a Dramatic Photo Manipulation of a Whale Stealing from a Seagull”
-
thanks alot
-
Awesome..!
-
wonderful. Thanx


 Mahdi El Hanafi is an author, Blogger, Programmer, Photographer, Graphic and Web Designer. You can find Mahdi on
Leave a Reply