
Turn any photo into a dot grid artwork with these Photoshop actions. You'll get great results with dots that change size. They get larger in brighter areas and smaller in darker areas. Free download available.
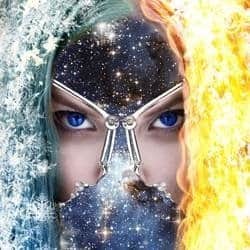
Create an abstract space fantasy photo manipulation inside Photoshop. This tutorial will show you how to combine several different images, blend them together using layer masks, and apply color adjustments.
Preview of Final Results
![image002[4]](https://cdn.photoshoptutorials.ws/images/stories/00d4587cf107_14ED/image0024.jpg?strip=all&lossy=1&quality=70&webp=70&avif=70&w=1920&ssl=1 "image002[4]")
Download the PSD
Space Fantasy Composition.zip | 112.4 MB
Download from Website
Fantasy Space Photo Manipulation Photoshop Tutorial
Resources
- Portrait of beautiful girl with snow in hair
- Stars Background
- The Earth seen from Apollo 17
- Fat Boy 2
- Fire Flames
- Frosty Edges Brush
- 15 African Tree Brushes
- Light Beams Brushes
Step 1
Open file " Portrait of a beautiful girl with snow in hair ". Open file " Stars Background ", Ctrl+A to select all, copy than paste it in our document. Resize it so it fits our girl layer.
![image003[4]](https://cdn.photoshoptutorials.ws/images/stories/00d4587cf107_14ED/image0034.jpg?strip=all&lossy=1&quality=70&webp=70&avif=70&w=1920&ssl=1 "image003[4]")
Step 2
Add a layer mask to the stars layer and fill it with black. Using a soft white brush paint with white in the layer mask until the image looks like shown below. Be careful around the hair.
![image004[4]](https://cdn.photoshoptutorials.ws/images/stories/00d4587cf107_14ED/image0044.jpg?strip=all&lossy=1&quality=70&webp=70&avif=70&w=1920&ssl=1 "image004[4]")
Step 3
Add a Hue/Saturation and use the settings shown below. Fill the layer mask with black than using a soft white brush paint with white the hair on the left side. This will be the icy hair.
![image005[4]](https://cdn.photoshoptutorials.ws/images/stories/00d4587cf107_14ED/image0054.jpg?strip=all&lossy=1&quality=70&webp=70&avif=70&w=1920&ssl=1 "image005[4]")
Step 4
Add another Hue/Saturation layer and use the settings shown below. Change the layer's blend mode to Linear Light. Fill the layer mask with black and using a soft grey brush paint the hair on the left side. This will be the fire hair.
![image006[4]](https://cdn.photoshoptutorials.ws/images/stories/00d4587cf107_14ED/image0064.jpg?strip=all&lossy=1&quality=70&webp=70&avif=70&w=1920&ssl=1 "image006[4]")
Step 5
Open file " Fire Flames ". Press Ctrl+A to select all, Ctrl+C to copy than use Ctrl+V to paste it in our document. Duplicate a few times this layer than resize each duplicate until it looks like shown below. We want the fire to cover the right side of the girl's hair. Select all fire layers and pres Ctrl+E to merge them than change this new layer blend mode to Screen. The black color will disappear, leaving us only with the fire flames.
![image007[4]](https://cdn.photoshoptutorials.ws/images/stories/00d4587cf107_14ED/image0074.jpg?strip=all&lossy=1&quality=70&webp=70&avif=70&w=1920&ssl=1 "image007[4]")
Step 6
Add a layer mask to the fire layer and paint with black to mask the straight lines and limit the flames only to the hair.
![image008[4]](https://cdn.photoshoptutorials.ws/images/stories/00d4587cf107_14ED/image0084.jpg?strip=all&lossy=1&quality=70&webp=70&avif=70&w=1920&ssl=1 "image008[4]")
Step 7
Paste the " Fire Flames " again into our document, resize it to make it biger, duplicate it once, merge the duplicates , change the layer blend mode to screen and paint with black in the layer mask to hide the flames outside the hair. This step will make the fire more intense and will add to the flames variety.
![image009[4]](https://cdn.photoshoptutorials.ws/images/stories/00d4587cf107_14ED/image0094.jpg?strip=all&lossy=1&quality=70&webp=70&avif=70&w=1920&ssl=1 "image009[4]")
Step 8
Make a new layer and choose white as foreground color. Than select some ice brushes and paint snowflakes in the left side of the girl's hair. Double click the background layer than press ok to make it a regular layer than select all the layers and group them using Ctrl+G. Name this group "Base".
2 comments on “Create a Fantasy Space Photo Manipulation Using Photoshop”
*Than*
I love it