
Next style is “Gradient Overlay”. Change Blend Mode to “Soft Light”, Opacity to 100%, Gradient: #000000 > #543318 > #c08d4e, Angle: 90 degrees, Scale: 100%. and click OK to apply styles.

Step 32
Change layer Blending Mode to “Darken”. Now we need to distort the runes so that they become similar to the ancient and carved in stone. Go to Filter > Distort > ZigZag and set Amount to -19, Radius to 20, Style “Out From Canter” and click OK. The next step, we’ll add a little bit of manual work.

Go to Filter > Liquify. Use Forward Warp Tool (W) from this window (finger icon) with Size: 11px, Density: 50 and Pressure: 100%. Very quickly and correctly apply a few diagonal strokes. The most important thing to runes become a little bumpy but remained recognizable. Duplicate this layer (Cmd/Ctrl + J or Layer > Duplicate Layer) and delete all styles from this copy (drag “FX” icon to the trash).

Step 33
The first layer creates a glow. This layer has the effect of concave/carved runes. Create a new styles for this layer. Go to Layer > Layer Style > Bevel & Emboss… Set Style to “Inner Bevel”, Technique “Chisel Hard”, Depth: 378% with down direction, Size: 1px, Soften: 0%. Highlight Mode “Screen”, Opacity: 70%, color: #555555.

Add style “Stroke” with Size: 1px, Position “Outside”, Opacity: 61%, Fill Type: color, Color: #000000.

The last style is “Inner Shadow”. Set Opacity to 50%, Angle to 90 degrees, Distance to 3px, Choke to 0%, Size to 7px. Click OK to apply layer style.

Step 34
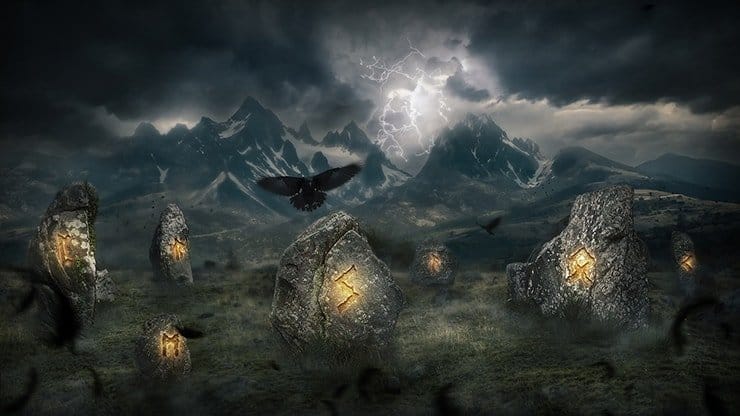
Here are the runes after the addition of styles and effects. It is realistic but not enough. You can try to change the color of the runes, but it is better not to change the style with shadows and bevel.

Step 35
Now it’s time to work with the brush. But first you need create a new layer (Cmd/Ctrl + Shift + N) and apply two styles “Inner Glow” and “Outer Glow”. Firs set for “Inner Glow” Opacity: 21%, Color: #ff4848, Size: 7px.

For “Outer Glow” style set Opacity to 20%, change Color to #890303, Size: 7px and apply style. Change layer Blending Mode to “Screen” Opacity: 57%, Fill: 50% and use b
6 responses to “Create a Mystical Photo Manipulation of the Great Ragnarok in Photoshop”
-

totally cool. I figured it might be way more steps, but when you are dealing with stock images and things, it goes much faster.
-
Thank you very much! I am very pleased to hear that! Optimization process an important part of the picture. This helps to save time and organize steps. Feel free to share your final result!
Maria.
-
-
What brush you use in 35 step??
-
I greatly love this good picture
-
Missing lightning image
https://pixabay.com/en/lightning-weather-rocket-983/ -
Unbelievable… ???
Leave a Reply