
Make your artwork look like they're from an alternate universe. These Cyberpunk presets work with Photoshop (via the Camera Raw filter) and Lightroom. Download all 788 presets for 90% off.
Creating a destruction scene is a very challenging part of any manipulation because it involves a lot of attention in detail, perspective, and proper use of images to achieve the best result. In this tutorial, I will explain to you how to create a destroying city manipulation by using some basic techniques like color correction, masking, and brushes.
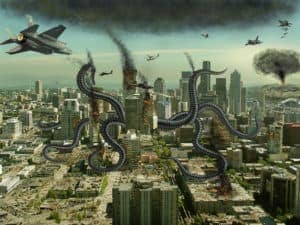
Preview of Final Results

Alien Invasion Photoshop Tutorial
Resources
- City - Dreamstime
- Demolished building 1 - Shutterstock
- Demolished building 2 - Shutterstock
- Demolished building 3 - Shutterstock
- Demolished building 4 - Shutterstock
- Demolition - Shutterstock
fighter-plane-2 - Renderat.com(Alternatives: 1, 2, 3, 4, 5)- helicopter 1 - Deviantart
- helicopter 2 - Deviantart
- helicopter 3 - Deviantart
- Crack1 - Hawkmont
- Crack2 - Hawkmont
Step 1
Create a new document of size 3000 x 2250 pixels and import "city.jpg" to the document. Size doesn't matter, but I suggest you always choose a large size so that you can pay more attention to details.

Step 2
Before going ahead, I prefer to visualize the scene so that I can get a direction to start my work. For this, select the pen tool and create the main object that is the arm of the octopus. Make sure to turn the path layer on and save as this path to "arm1", press Ctrl + Enter and fill the layer with a bright color.

Step 3
Repeat the second step to create more arms of octopus and save all paths. Go to the path palette to access these paths, select one path, go to File > Export > Path to Illustrator and export this path to edit it in Illustrator. Similarly, export all paths to illustrator.

Step 4 - Creating divisions in arm
Now open the adobe illustrator and import all paths to one file and refine their edges and curves to make it perfect. Next, we will create segments of the arm to give it robotic look. For this, select the line segment tool ( \ ) and create a vertical line of height 20 mm and weight 1 point. Select that line segment then go to brush palette and click on the new brush icon to create a new brush. Select pattern brush option and set the spacing to 500%, this will repeat vertical lines uniformly to create divisions of the arm.


Step 5
Select the pen tool and create a baselining through the center of arm, press "A" to select the direct selection tool, and edit this lining to make it perfect. Now go to brush palette and select the new brush which we just have created. You will see that several lines are aligned through the path and created the divisions for the arm.
3 comments on “Create an Alien Invasion Photo Manipulation in Photoshop”
The photo manipulation is stunning! The skills to produce this kind of work are impressive. However, I found that the links for the crack 1 and 2 brushes were broken. If you could fix these, it would make the tutorial even better :)
Thanks for that tutorial!
I just wanted to let you know that the link to your other tutorials doesn't work.
Have a fun day and stay safe.
Sorry, which links are broken? I can't find any broken links.