
Make skin look perfect in one-click with these AI-powered Photoshop actions.
In this tutorial we are going to create a fantasy scene where a witchy women will be holding a sacred log in her hands. With this tutorial we are going to cover interesting topics like working with textures and blending modes, lighting, advanced image cutting techniques, and typography.
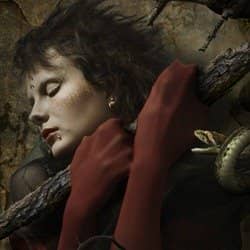
Preview of Final Results

Eerie Portrait Photo Manipulation Photoshop Tutorial
Resources
- Model - Flex-Flex
- Wall Texture - fudgegraphics
- Retro Wallpaper - Texturepack
- Forest - silaynnestock
- Cracks 1 - Jaydias
- Cracks 2 - sd-stock
- Fountain - phatpuppy
- Dead Tree - wicasa-stock
- Dead Tree 2 - diesel-stock
- Log - sxc.hu
- Stonage Art Brush - qbrushes
- Font - ffonts
- Snake - madetobeunique
- Dead Tree 3 - sxc.hu
Step 1
Create a new canvas in Photoshop with the dimensions Width=2489px and Height=3872.

Step 2
1) Now import the image of the Model into Photoshop and create a mask around the body using the Pen Tool (P). While masking the hair create a rough mask because we will be using different technique to cut the hair with details.


2) Create a rough mask as shown around the hair and open the Refine Edge from Select>Refine Edge and set the output to New Layer and select the Refine Radius Tool and paint the edges of the hair to detect the fine details of the hair.
Then press OK to separate the model into a new layer with fine details.


Step 3
1) Import the image of Wall Texture onto the canvas and place it on the background and add a Gaussian Blur of Radius=1.6px.

2) Now import the image of the Retro Wallpaper in the background and reduce its Opacity to 74%.

Step 4
In this step we will be adding a forest backdrop to the background.
- Import the image of the Forest onto the background.

2) Now convert the forest image into black and white using Image>Adjustments>Black & White.


3) Now change the Blending Mode of the forest layer to Overlay and reduce its opacity to 35%.


Step 5
In this step we will be creating cracks in the background using textures.
- Import the image of the Cracks 1 onto the background and place it as shown.

2) Now set the Blending Mode of the layer to Overlay.

3) Now reduce the brightness of the cracks layer to -38 using Brightness/Contrast.
-Then similarly add few more cracks in the background to make the background look old.

Step 6
In this step we will be color correcting the model to blend the model in the scene.
- With the model layer selected go to Image>Adjustments>Curves and set the curves as shown.

2) Now darken the shadows of the model using the Exposure. With the model layer selected go to Image>Adjustments>Exposure and set the Offset=-0.0102 and Gamma Correction=0.90.

3) Now by using the Hue/Saturation de-saturate the model to -30.
One comment on “Create an Eerie Portrait Photo Manipulation with Photoshop”
This is a fabulous tutorial; thank a lot for the upload mate!! Definitely subscribing!!