
Step 52
Create a new layer and use soft white brush to brighten the part above model head and along the pagan symbol. Change the mode to Overlay 100%:


Step 53
On the top of layers, use Lasso Tool (L) to make a selection for the bottom right of the image and set feather for it as 50:

Go to Layer-New Adjustment Layer-Channel Mixer:

This is what we have:

Using adjustment layers for coloring effect will give you more control, just change the settings anytime to get the effect you want.
Step 54
We had a pretty nice blue effect but i still want to make it look better and more subtle.
On Channel Mixer layer mask use soft black brush with opacity and flow varied from 25-30% to 100% to reduce and remove blue effect on model body. The masking method is making the parts which nearer to the top and ground bluer and the rest less. You can look at my result on layer mask and on picture as a reference:


Step 55
I used a Curves layer with same method to adjust blue light and contrast. I placed this Curves layer under Channel Mixer one:

The result on Curves layer mask and on picture:


Step 56
I used a Vibrance layer to enhance the blue effect:


Step 57
Make a new layer and use brush with color #0dc2e9 to paint on the hair. Change the mode of this layer to Color 100%:

Step 58
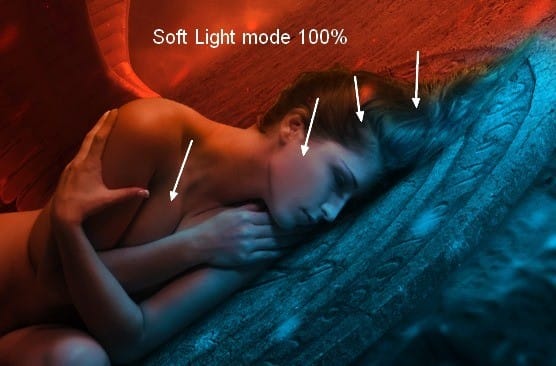
On a new layer I used brush with color #12c4e7 to paint on the hair, face and body. Put the mode of this layer to Soft Light 100%:


Step 59
I used a new layer to draw some blur hair strands for model. The color used is #0dade9 and size from 6-10 px:

Step 60
To add more blue to these strands I used a Color Balance with Clipping Mask:


Step 61
Make a new layer with same settings in step 35 (but uncheck Clipping Mask options). Use Dodge Tool to make cheek highlight and darken a small part on model knee:


Step 62
Now we’ll take time for red effect. Add a new layer on the top, use brush with color #f64616 and size 7 px to draw some strands on the hair where catches the red light from sky. I applied Gassian Blur with 2 px for them:

Step 63
Create a new layer and lower brush size to 1 px, opacity to 50%. Use it to paint smaller strands:
10 responses to “Create an Intense Fallen Angel Composition in Photoshop”
-
This is a great tutorial. The desert and wings stock links don’t work but I found other ones to use.
-
Awesome Post. Lighting is most beautiful. Thanks for the Post.
-
So Good Tutorial Photoshop
-
where can i download files required
-
Hey Jenny,
Could I use this tutorial and create a front cover for my bands album? Thanks :)!
-
Thank you for this great tutorial that I tried:
http://cartes-mireilled.eklablog.com/composition-d-un-ange-dechu-avec-photoshop-a106623770 -
please give me download options
-
Nice tutorial
-
I love your tuts Jenny!
-
Beautiful work and tutorial!


Leave a Reply