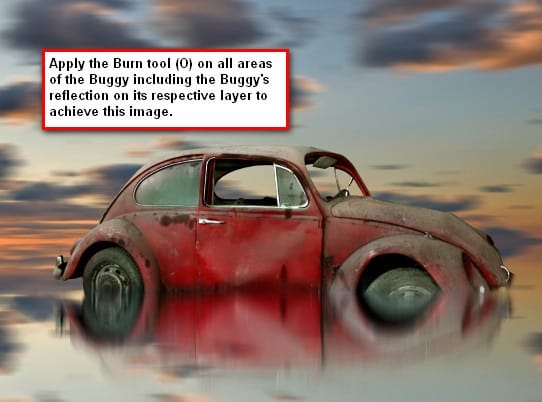
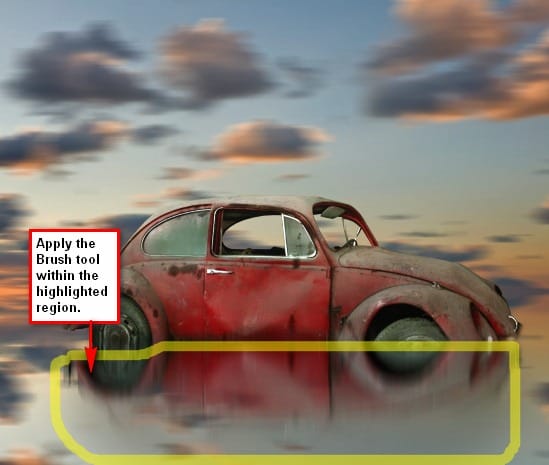
Note: Include all the layers that you would be creating on this step within the “Buggy and its shadow” group.
First let’s fix the error in the window which has a reflection from the camera’s flash. First, let’s adjust the zoom level on the Navigator window; input a zoom level of 100%.

Activate the Clone Stamp tool (S) and then input these settings:
- Brush size: 50px
- Hardness: 0%
- Opacity: 100%
- Flow: 100%
To use the Clone Stamp tool (S) first you’d have to click on area which you want to clone (to do this, press Alt + Left-click) and once you’ve selected an area, left-click on the spot you want replaced.

The result should be similar to the image below after cloning:

Now let’s adjust the colors of our subject. Click on the “Buggy” layer and then go to the Menu bar and select Image > Adjustments > Color Balance and input these values, respectively:
- Color Levels: +15, 0, -15
- Tone Balance: Midtones
- Preserve Luminosity: Checked
Now let’s use the Burn tool (O) to alter the light on the Buggy.

Activate the Burn tool (O) and input the values below:
- Brush size: 300px
- Hardness: 0%
- Opacity: 15%
- Flow: 100%

Now let’s create the shadow to where the Buggy is stationed. Create a new layer by pressing Ctrl/Cmd + Shift + N and press OK. You may also do that by going to the menu bar and clicking on Layer > New > Layer or simply by pressing the Create New Layer button on the Layer Window which is represented by a paper-like icon beside the Delete Layer icon (trash-can). Rename the new layer to “shadow”. This layer should be above all the layers that have been created.

Activate the Brush tool (B) and input the following values:
- Brush size: 600px
- Hardness: 0%
- Opacity: 25%
- Flow: 100%
- Brush Color: 000000
Note: The brush’s color can be changed from the Color Picker menu. It can be activated by clicking either on the “Set foreground color” or “Set background color” on the Tools window.


Create a new layer and rename it to “light”. We will be adding light to the center of the image to improve the sky’s contrast. Put this layer on top of the “shadow” layer.
Activate your Brush tool (B) and input the following values:
- Brush size: 2500px
- Hardness: 0%
- Opacity: 8%
- Flow: 100%
- Brush color: ffffff

Step 5 – Create a Vignette
In this step, we would be creating a Vignette to make our subject stand out. To start off, go to the Menu bar and click on File > New and use the same settings we used to create our canvas. (Refer to Step 1). But take note, the background contents should be: WHITE. Once it has been created, go to Filter > Distort > Lens Correction. Find the tab Vignette and use these settings:
3 responses to “How to Create A Long Exposure Sunset Image Using Photoshop”
-
Perfect
-
Gr8
-
WoooW !!
This is fantastic not only the image but the processes. Totally awesome. Thanks very much !!!!


Leave a Reply