

I use Pen Tool (P) to create a flat path and then create selection from path (right click > Make Selection, Feather radius 0px). Add a layer mask to remove interfering houses. In this photo manipulation I use fragments of houses in the middle of everything else I removed, because the other houses portions are in a different scale.

Step 6
Now make the village a little more. I chose a small fragment of houses, duplicate original layer (Cmd/Ctrl + J or Layer > Duplicate layer) and on the layer mask removed all unnecessary, except the required fragment. Use Move tool (V) to move fragment in desired location. To flip horizontally, go to Edit > Transform > Flip Horizontal.
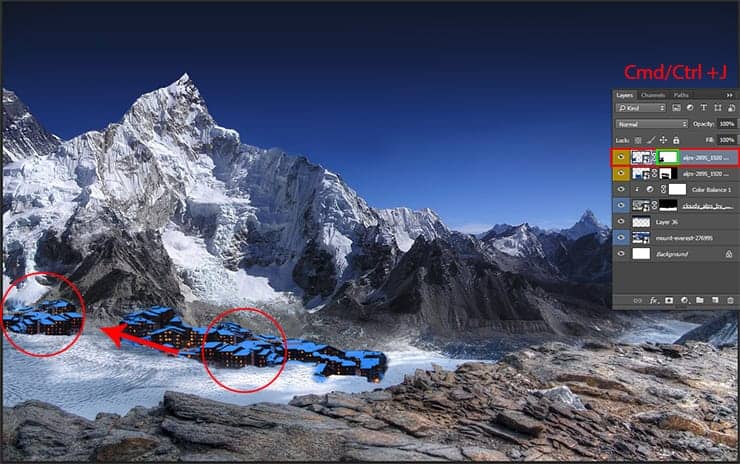
The same piece I located in other place, as shown in the figure. Principle I think you misunderstood and can create your own version of the village. I added another piece to bridge the houses. Now I will correct color of houses. Do not think that the night could hide all the defects. It is much easier to create a light, when all objects in the same key. First you need group all layer with village (select layers and use Cmd/Ctrl + G or layer > Group Layers). Now add adjustment layer “Selective Color”.

Now add adjustment layer “Selective Color”. For Red colors set: Cyan: -91, Magenta: -87; for Cyan colors: Black: -100; for Blue colors: Black: -100; for Neutrals colors: Cyan: +5, Magenta: +1, Yellow: +13, Black: -32. This correction make village on normal colors without blue tint. Clip this layer (Cmd/Ctrl + Opt/Alt + G) to group and move on.

Step 7
Once we have dealt with the landscape and the village, you can proceed to the vegetation. Place image “Forest landscape” in working document (File > Place (Place Embedded)). Flip Horizontal image (right click on Transform mode > Flip Horizontal) and resize it with Transform Tool (Ctrl/Cmd+T or Edit > Free Transform).

Use Quick Selection Tool (W) to select the left fragment of forests and remove everything else by adding a layer mask. Go to mask settings (double click on mask and you go to Properties tab) and click on “Mask Edge” button. In “Refine Mask” set check-box on “Smart Radius” and make Radius: 3.0px. Then set Shift Edge: -20%. Use brush in this window to remove the excess from the edges of the forest and click OK.
3 responses to “Create a Magical Starry Night of Polar Bears in Photoshop”
-

Just a pity the PSD is not there it would have been nice to see your flow
-
The best as usual.
-
Very beautiful and difficalt lesson. Thanks.
Leave a Reply