
Now that is all done, select all the layers that we’ve made in steps 4 to 6 and press Ctrl/Cmd + G to group them.
Step 28
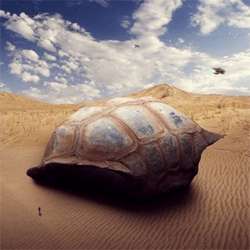
Now, we will create the distant man walking towards the tortoise shelter. To start, let’s open “Winter Walking” by tlst. Once it is opened, activate the Magnetic Lasso Tool (L) and create a selection area around the man shown below:

Next, activate the Move tool (V) and drag the selected boy to our canvas. Put this layer above all the layers that we’ve created and rename this layer to “man”. Position the “man” as shown below:

Step 29
Next, activate the Transform tool (Ctrl/Cmd + T) and then resize the image to the size shown below:

The result of that should be similar to this:

Step 30
Next, let’s turn this man into a shadowy figure; to start, make sure that the “man” is selected and then go to Image > Adjustments > Brightness/Contrast. Once it is open, input the following:

The result:

Step 31
Next, go to Filter > Blur > Motion Blur and input the following:
- Angle: 90′
- Distance: 20px

The result:

Step 32
After that, change the layer opacity of the “man” to 70%. To do that, simply go to the Layer window and left-click on the 100% value beside Opacity and from there you can change the layer’s opacity.

Step 33
Now, let’s make the shadow of the “man”. Duplicate the “man” by pressing Ctrl/Cmd + J. Now, activate the Transform tool (Ctrl/Cmd + T) and then right click on the canvas to bring up the contextual menu – once it is opened, click on the “Flip Vertical” tab.

Once it has been flipped vertically, activate the Move tool (V) and drag it down until it resembles a shadow. See image below:

Step 34
Next, activate the Transform tool (Ctrl/Cmd + T) and then right click on the image to activate the contextual menu and then click on Distort.

Now, let’s distort the image as shown on the following images below:


Step 35
Next, activate the Eraser tool (E) and input the following values:
- Brush size: 100px
- Hardness: 0%
- Opacity: 100%
- Flow: 100%

The result of that would be like this:

Step 36
Now, let’s create the ships flying over the shelter. To start, open “Sci-fi Prop 1 Stock” by inadesign-stock. Once open, activate the Polygonal Lasso tool (L) and create a selection area around the ship as shown below:
3 responses to “How to Create a Sci-Fi Giant Tortoise Shelter Photo-Manipulation”
-

Some of these tutorials are extremely good, magazine like. Thanks for sharing!
-
Links are broken :/
-
This tutorial is really interesting and easy to understand.Thanks for shari
Leave a Reply