
Step 38
Finally, let’s make the duplicated layer look like it is a little farther from the original ship. Change the layer opacity of the duplicated layer to the following:

The result:

Step 39
Now, select all the layers that we’ve created for this step and press Ctrl/Cmd + G to group these layers.
Step 40
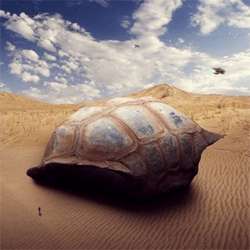
Now, we will enhance the color and overall brightness of the image. To start, let’s create a Solid Color adjustment layer. From the Layer window, click on the “Create New Fill/Adjustment layer button”.
![image032[1]](https://cdn.photoshoptutorials.ws/images/stories/384d402cec5a_1186B/image0321.jpg?strip=all&lossy=1&webp=82&avif=82&w=1920&ssl=1 "image032[1]")
Once the contextual menu opens, click on Solid Color:

Now, clicking on the Solid Color option will open the Color Picker box. Now, input the following on the #: space.

Step 41
Next, let’s change the Blending mode of this Solid Color so our image isn’t filled with brown. Change the Blending mode and Opacity to:
- Blending Mode: Soft Light
- Opacity: 30%
Note: To change the Blending mode, simply click on the Solid Color and then go to the Layer window and find the “Normal” option. Click on that and it will open a contextual menu, once its open, click on Soft Light as shown on the image below

Step 42
Next, let’s adjust the overall Brightness/Contrast of the image, to do that, simply click on the Create New Fill/Adjustment layer button and then click on the Birghtness/Contrast from the contextual menu.

Once it’s open, input the following:
- Brightness: 25
- Contrast: 25
- Use Legacy: Uncheck

Step 43
Next, let’s create another Solid Color adjustment layer. This time, input the following values:
- #: 00011d

Step 44
Once your canvas is all blue, change the Blending mode and Opacity to the following:
- Blending mode: Exclusion
- Opacity: 60%

Step 45
Finally, let’s create a levels adjustment layer from the Create New Fill/Adjustment layer button.

Once it is open, input the following:
- Channel: Green
- 15, 1.00, 255

Don’t close the Levels box yet, because we would now input the following for the Blue channel:
- Channel: Blue
- 15, 1.00, 255

The resulting image should be similar to this:

Final Results

Download the PSD
How to Create a Sci-Fi Giant Tortoise Shelter Photo-manipulation PSD.zip | 106.76 MB
Download from Website
Authors Comment
 Thank you for visiting this page and using my tutorial, if you want to see more of my art works, give me a shout at my website: https://www.wix.com/theflickerees/michaelVmanalo
– Michael Vincent Manalo
3 responses to “How to Create a Sci-Fi Giant Tortoise Shelter Photo-Manipulation”
-

Some of these tutorials are extremely good, magazine like. Thanks for sharing!
-
Links are broken :/
-
This tutorial is really interesting and easy to understand.Thanks for shari
Leave a Reply