

Pass the black brush over the selected area and the result will be this one:
After that change the size of the image.

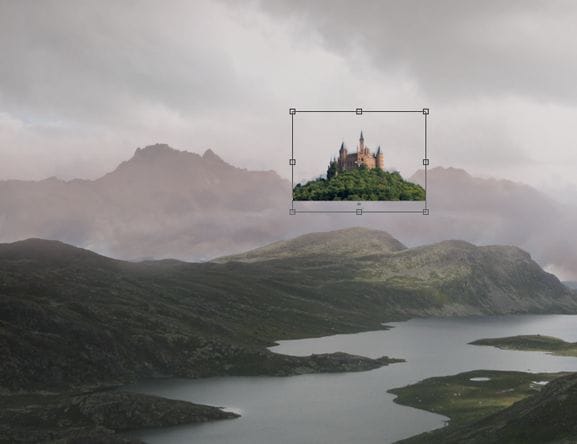
Step 12 – layer opacity
Change the castle layer to 25% of opacity and hide some other parts

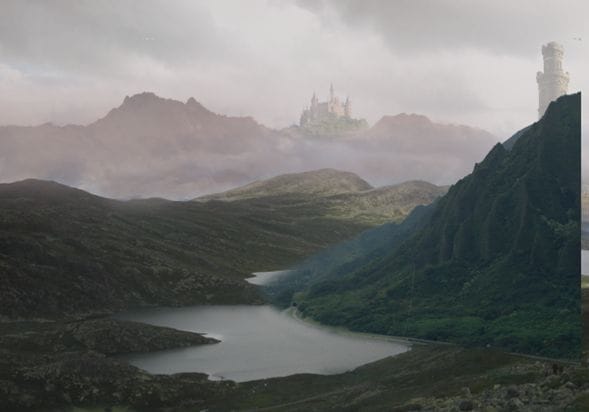
Step 13 – Tower
Repeat the process you made before with the tower. The opacity of the layer is 30%

Step 14 – Mountains
To add some more mountains to the image place a new layer.
Step 15 – Layer mask
You only need the big mountain, so select it with layer mask like before.
Step 16 – Size
Press Ctrl+T to change the size of the mountain to fit the image. Also you can use the black brush to fix some details

Do the same with the other mountain, but this time reduce the opacity of the layer to 80%

Step 17 – place Sky
Place the layer of the sky

Step 18 – Hard light
Use the layer in hard light mode, reduce the opacity to 75%. Also add a layer mask to the image and hide some parts.

Step 19 – orange
To give more intensity to the sunset paint with a soft round orange brush in the sky. Use the layer in soft light mode. You can set the opacity to the pressure of your tablet, or if you don’t have a tablet the opacity can be 30%.

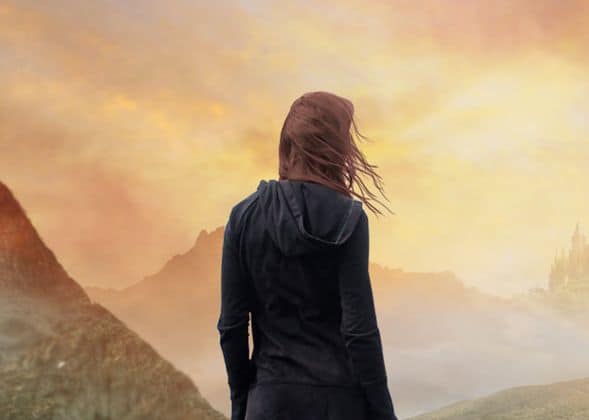
Step 20 – The Model
Place the model and like you did before select her using a layer mask.


Step 21 – Hair
Select only the hair and press Ctrl + J to duplicate the layer.

Step 22 – Change color
Press Ctrl+U to change the color of the model’s hair. You have a menu, select the option Colorize and then use the option Hue in 9, the option Saturation at 25 and the option Lightness in -30.

Step 23 – The Hair
To paint the hair you will need a tablet to get better results, but that doesn’t mean that you can’t do it with you mouse. To star pick the same color of the hair with the eyedropper tool, after that paint some hairs not too big not too small. Use a soft round brush 2px.
Paint some more strands

Step 24 – White Strokes
Make some white strokes to give highlights to the hair.

Add some with a lighter tone of brown

Step 25 – Shadow
To make a shadow in the model’s hair paint with a soft round black brush in the hair like this:

Change layer to soft light

Step 26 – Lights and Shadows
Paint a new layer with a gray tone like this:

With the dodge and burn tool pass over that layer, to make shadows and light. Use the layer in soft light mode to do this.

Step 27 – Orange
In a new layer paint with a soft round orange brush to create light over the mountains, remember the direction of the light, where light is coming from.
38 responses to “How to Create a Stunning Surreal Landscape”
-

Most of link to pictures are dead.
Please upgrade. -
so hard
-
UGHHHH I CANT DO ANYTHING HELP ME
-
omg this sucks!!!! it did not help at alll. jujst made everything trickier!! UGHH!!!.
-
It’s cool
🤓🤓🤓🤓 -
Why no images from steps 1 to 7 and steps 23 to end?
-
Images seem to show up fine on my end
-
-
Nice one bro…was the picture taken via a phone?
-
VereGUOD
-
VERY IMPORTANT: Anytime you use stock materials from DeviantArt, it’s vital to take note of the poster’s rules regarding use of their stock. Some freely provide it for use however you see fit; others want only credit of some kind; still others restrict permission to DeviantArt account holders and specify that the result can be posted only to DeviantArt.
-
great:)
-
WOW! greeeeaaaat! I want moooooreeee!!!
-
greeeeaaaat! I want moooooreeee!!!
-
I did in the past some of your tutorials here: http://annewipf.deviantart.com/gallery/46678452/Done-from-tutorials
But we can’t see the tutorials on photoshop-tutorials anymore. :(
I tried to contact them, but it doesn’t operate. :(
Please, do you know if we have to pay something, of everything else we can do? I loved to do the tutorials I found here and I often give the link to photoshop-tutorials to beginners, so it is quite ennoying. Thank you. -
I like chicken #PancakeGoals
-
ممنون.tanks
-
Help Me… :(
-
xD learn
-
-
Help Me Im So Confuse… :(
-
Beautiful, creative and acutely enjoy able!
-
Why can not I find the source files?
Please help to find them.
Thank you. -
Thanks so much for a great tutorial. There were some aspects I had to guess, and I believe one of the mountain images had to be flipped before it could be used, but for a newbie in photo-manipulation, this was fantastic.
-
What am I doing wrong?! I am doing everything step by step but when I add the 2nd picture and try to meld it into to the background it doesn’t work. It still looks like I would’ve glued another photo on top of the other one even though I’ve done everything on the tutorial. Yep they share the same color however the 2nd pictures outlines are still visible (the square lines) I am terrible with explaining :D
-
Amazing… thank you.
-
Hey, awesome tutorial!!
I’m not that good with photoshop, I only got it for two months :)
But this is still worth a try, will be fun I guess :)
XOXO -
Very awesome tutorial. This is just amazing, way beyond my skill level, but it has certainly opened up my eyes to what can be done with Photoshop. Thanks,
-
Step 10? I’m totally confused there. Any help?
-
Wow! Thank you for sharing.
-
awsome crativity
-
Hi,
I want to get reflection of images anglewise (from different point of source of light). -
there are repeated photos in the tutorial… :( find some of the steps interesting but wrong photo makes the tutorial somewhat bad… :( although the concept is awesome… but the flow is altered… i rate it 3.5 out of 5… but the steps deserve 5 out of 5… :)
-
Where to get the picture in step 4 river? I’ve been looking at the user Faestock and can not find or rather, does not exist.
Thank you very much.
-
-
Why are no Pictures on the third side.
No pictures from step 23 to end ?
Please fix.
Thanks. ;-)
-
Thanks! We don’t know what happened but the images have been fixed :)
-
-
wtf happened between step 20 and 21
-
That’s a great title for a thriller
-
-
really good………
-
Good tutorial
Leave a Reply