

Step 14
Use hard round brush and mask area with mountains.

Step 15
Add new layer. (Shift + Ctrl + N or marked shortcut). Use big, soft round brush, choose #a9a9a9 color, set brush opacity to 50%. You’ll create lights on mountains – draw some blurred dots on the edges of mountains, where light goes. For better effect on the left top, You can use #2e2e2e color and draw a few dots.

Step 16
Change blending mode to Color Burn and decrease opacity to 27%.

Step 17
Duplicate created layer – drag it and drop to new layer symbol or go to Layer > Duplicate layer.

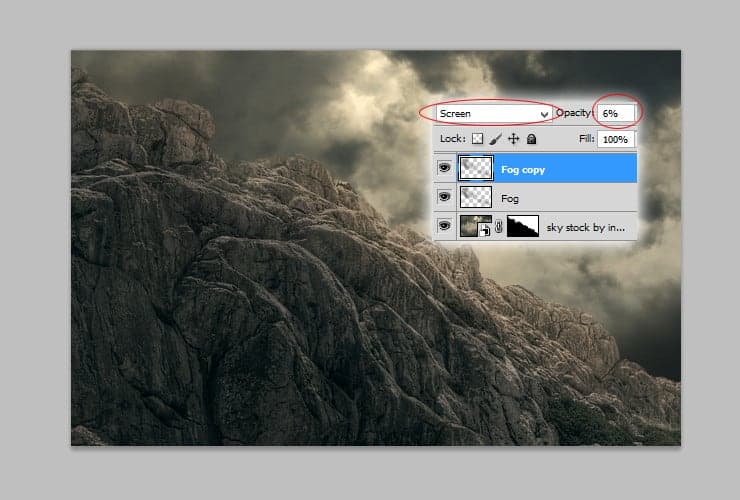
Step 18
Change blending mode to Screen and decrease opacity of this layer to 6%
Step 19
Add new layer. (Shift + Ctrl + N or marked shortcut). Use big, soft round brush, choose #c8b998 color. You’ll create lights on mountains – draw strokes on the edges of mountains, where light goes.

Step 20
Change blending mode to Linear dodge (Add), decrease its opacity to 22%.

Step 21
Place “Grass clumps 04” stock to your file. Set it as is shown. Create ground! Here’s no need to worry about color adjustments.

Step 22
Place “Golden Rune Sword”, transform it as is shown.
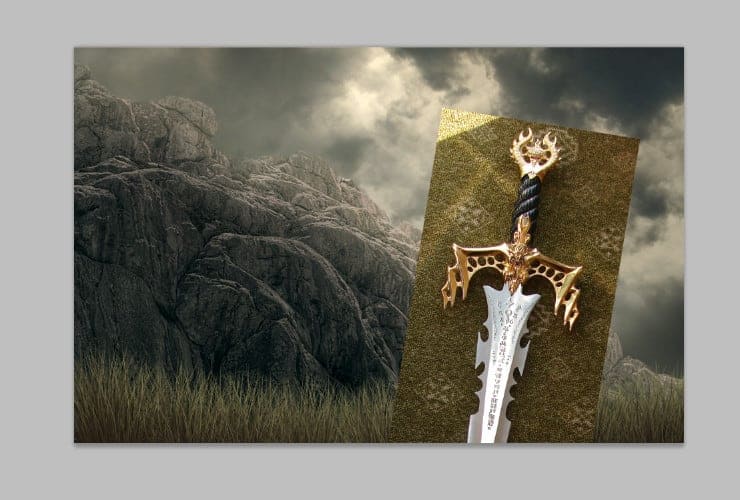
Step 23
Mask sword with hard round brush.

Step 24
Add new adjustment layer with Color Balance. Go to Layer > New adjustment layer > Color Balance or use marked shortcut. Then, right-click on this layer and choose “Create clipping mask” (Alt+Ctrl+G or Layer > Create Clipping Mask).

Step 25
Then, add new adjustment layer with Hue/Saturation. Go to Layer > New adjustment layer > Hue/Saturation or use marked shortcut. Next, right-click on this layer and choose “Create clipping mask” (Alt+Ctrl+G or Layer > Create Clipping Mask).

Step 26
Add new layer (Layer > New > Layer… , Shift + Ctrl + N or marked shortcut). Follow the light source and draw shadows on sword hilt. Use small, soft round brush with dynamic pressure size, set #232827 color and draw gently strokes. Next, right-click on this layer and choose “Create clipping mask” (Alt+Ctrl+G or Layer > Create Clipping Mask).

Change blending mode of this layer to Linear burn and decrease its opacity to 55%.
11 responses to “Create This Surreal and Medieval Style of a Battlefield in Photoshop”
-

I can only see step 45 and below. Any help please?
-
battlefield’s missing
-
Can’t see
-
This is an *excellent* tutorial. I’m experienced in Photoshop, but a novice (at best) when it comes to photo manipulation at this level. The steps to this tutorial were baby-easy to follow, and my resulting work was nearly identical to the tutorial’s. Even at individual steps, my canvas matched the photos. Not once did I have to start doing additional work to reach the same point as the tutorial. That’s so rare!
This is really the only in-depth tutorial I’ve followed that doesn’t assume fore-knowledge, shows all the necessary elements, doesn’t skip details, and thoroughly explains steps and processes without over-elaborating. And all that without asking me to pay for stock! Fantastic!
Thank you for such a detailed and well-built tutorial, I’m on my way to see what else you’ve got.
-
Supab
-
Thank you so much! Just a great lesson!
-
Step 50 – rubbish!!
-
Step 48 – Channel mixer – Green – green – -58) Thanks for tutorial, awesome =)
-
nice
-
The link to the Battleground Skies doesn’t work – states it’s invalid.
-
Great!
Leave a Reply