
Luminar AI lets you turn your ideas into reality with powerful, intelligent AI. Download the photo editor and see how you can completely transform your photos in a few clicks.
Learn how to create a surreal mother nature photo manipulation. This tutorial will show you how to create a completely surreal scene by combining stock photos and blending them seamlessly. You’ll also learn how to fix and enhance the lighting of your images.
Totally in this tutorial we are not blending 4 and 5 images we are going to use more then 12 and we will learn how to merge them to make them look like one image.These techniques are vary useful while doing any matte painting and postproduction.
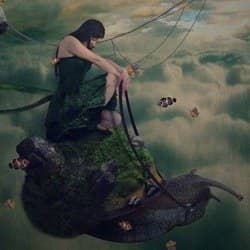
Preview of Final Results
![final-results[15]](https://cdn.photoshoptutorials.ws/images/stories/78c00660ee68_10D4C/final-results15.jpg?strip=all&lossy=1&quality=70&webp=70&avif=70&w=1920&ssl=1 "final-results[15]")
Create a Surreal Scene with a Cool Snail that Flies
Tutorial Resources
- cloud - le-scud
- stormy sunset - night-fate-stock
- Wots up world - priwax
- Sorrow 15 - Kuoma-stock
- rocks 2 - consideritfox
- stones - peppilou80
- Autumn Leaves - LinwoodStock
- Grey Horse English Riding - Tamino1
- Fish Stock 1 Shoofly-Stock
- Tree 06 Stock FrostBo
- Rock stock PirateLotus-Stock
- Temples Punkystock
- Tree stock lillyfly06-stock
- Moss on concrete stock.xchng
- Birds of a Feather - midnightstouch (Brusheezy)
- metal texture 15 - wojtar-stock
- 2.07 Ribbon Dancing - vampbabe-stock
- Mountain Goat : 03 - taeliac-stock
- Rock stock - PirateLotus-Stock
Step 1: Create a New Image File
Create a new file with a width of 3000 px and a height of 3500 px at 300 dpi (Dots per Inch). Background Contents should be White.
![1[10]](https://cdn.photoshoptutorials.ws/images/stories/78c00660ee68_10D4C/110.jpg?strip=all&lossy=1&quality=70&webp=70&avif=70&w=1920&ssl=1 "1[10]")
Step 2: Create the Sky
First off, let’s open the cloud stock in Photoshop. We will be using the sky from this stock image so we will need to transfer it to our main canvas.
Click the cloud and press V to activate the Move Tool. Left-click the image and drag the image to the main canvas and change layer name to "Sky 1".
![2[10]](https://cdn.photoshoptutorials.ws/images/stories/78c00660ee68_10D4C/210.jpg?strip=all&lossy=1&quality=70&webp=70&avif=70&w=1920&ssl=1 "2[10]")
Next, activate the Transform tool (Ctrl/Cmd +T), then while the “Sky 1” layer is selected and then resize it as shown below:
![3[10]](https://cdn.photoshoptutorials.ws/images/stories/78c00660ee68_10D4C/310.jpg?strip=all&lossy=1&quality=70&webp=70&avif=70&w=1920&ssl=1 "3[10]")
The result should be similar to this:
![4[10]](https://cdn.photoshoptutorials.ws/images/stories/78c00660ee68_10D4C/410.jpg?strip=all&lossy=1&quality=70&webp=70&avif=70&w=1920&ssl=1 "4[10]")
Now go to Image > Adjustment > Brightness/Contrast.Do all these settings below :

The result should be similar to this:

Now, let’s open the stormy sunset stock in Photoshop. We will be using the sky from this stock image so we will need to transfer it to our main canvas.
Click the stormy sunset and press V to activate the Move Tool. Left-click the image and drag the image to the main canvas and change layer name to "Sky 2".
![5[10]](https://cdn.photoshoptutorials.ws/images/stories/78c00660ee68_10D4C/510.jpg?strip=all&lossy=1&quality=70&webp=70&avif=70&w=1920&ssl=1 "5[10]")
Now that you’re done, activate the Eraser tool (E) and input the following:
- Brush size: 400px
- Hardness: 0%
- Opacity: 40%
- Flow: 100%
Now, let’s Erase:
![6[10]](https://cdn.photoshoptutorials.ws/images/stories/78c00660ee68_10D4C/610.jpg?strip=all&lossy=1&quality=70&webp=70&avif=70&w=1920&ssl=1 "6[10]")
The result should be similar to this:
![7[10]](https://cdn.photoshoptutorials.ws/images/stories/78c00660ee68_10D4C/710.jpg?strip=all&lossy=1&quality=70&webp=70&avif=70&w=1920&ssl=1 "7[10]")
Step 3: Enhance the Color of our sky.
In this step, we will be retouching our image. Let’s start by creating a Brightness/Contrast adjustment layer which can be found by pressing on the Create New Fill/Adjustment layer button shown on the layer window:
![8a[10]](https://cdn.photoshoptutorials.ws/images/stories/78c00660ee68_10D4C/8a10.jpg?strip=all&lossy=1&quality=70&webp=70&avif=70&w=1920&ssl=1 "8a[10]")
![8b[10]](https://cdn.photoshoptutorials.ws/images/stories/78c00660ee68_10D4C/8b10.jpg?strip=all&lossy=1&quality=70&webp=70&avif=70&w=1920&ssl=1 "8b[10]")
When the Brightness/Contrast box opens, input the following:
- Cyan: -30
- Green: 20
- Yellow: -14
![8[10]](https://cdn.photoshoptutorials.ws/images/stories/78c00660ee68_10D4C/810.jpg?strip=all&lossy=1&quality=70&webp=70&avif=70&w=1920&ssl=1 "8[10]")
The result should be similar to this:
![9[10]](https://cdn.photoshoptutorials.ws/images/stories/78c00660ee68_10D4C/910.jpg?strip=all&lossy=1&quality=70&webp=70&avif=70&w=1920&ssl=1 "9[10]")
Now create a Color Balance adjustment layer which can be found by pressing on the Create New Fill/Adjustment layer button shown on the layer window:
8 comments on “Create a Surreal Scene with a Cool Snail that Flies”
Half the links don't work.
What a shitty tutorial. No mention of why any of the steps are done. Just bullshit "input these values". Thanks for nothing asshole.
Nice and useful! Well done, thank you.
Sorry , I was thinking in Greek ... i meant helpful ...
There are broken links in photos( and there is no PSD file of the tutorial( can you, please, add?
Hello,
there are some broken links, can u fix please?!
theres a couple of broken links :(
good job,thanks.