![41[10] 41[10]](https://cdn.photoshoptutorials.ws/images/stories/78c00660ee68_10D4C/4110.jpg?strip=all&lossy=1&webp=82&avif=82&w=1920&ssl=1)
Scale it small and place over “moss” layer.
![42[10] 42[10]](https://cdn.photoshoptutorials.ws/images/stories/78c00660ee68_10D4C/4210.jpg?strip=all&lossy=1&webp=82&avif=82&w=1920&ssl=1)
Now Add layer mask to the “rock1” and activate brush tool (b) with these settings:
- Brush size: 400px
- Hardness: 0%
- Opacity: 40%
- Flow: 100%
![37a[40] 37a[40]](https://cdn.photoshoptutorials.ws/images/stories/78c00660ee68_10D4C/37a40.jpg?strip=all&lossy=1&webp=82&avif=82&w=1920&ssl=1)
Now paint:
![43[10] 43[10]](https://cdn.photoshoptutorials.ws/images/stories/78c00660ee68_10D4C/4310.jpg?strip=all&lossy=1&webp=82&avif=82&w=1920&ssl=1)
The result should be similar to this:
![44[10] 44[10]](https://cdn.photoshoptutorials.ws/images/stories/78c00660ee68_10D4C/4410.jpg?strip=all&lossy=1&webp=82&avif=82&w=1920&ssl=1)
Now create new curve adjustment layer from the bottom of layers palette. Press Alt+left click in between 2 layer’s (rock1 layer and Curve) to make a mask.
![45[10] 45[10]](https://cdn.photoshoptutorials.ws/images/stories/78c00660ee68_10D4C/4510.jpg?strip=all&lossy=1&webp=82&avif=82&w=1920&ssl=1)
The result should be similar to this:
![46[10] 46[10]](https://cdn.photoshoptutorials.ws/images/stories/78c00660ee68_10D4C/4610.jpg?strip=all&lossy=1&webp=82&avif=82&w=1920&ssl=1)
Once again, let’s open the “rocks 2” stock in Photoshop. We will be using the rock from this stock image so we will need to transfer it to our main canvas.
Click the “rocks 2” and press P to activate pen tool and then make a selection around the rock and then click V to activate the Move Tool. Left-click the image and drag the image to the main canvas and change layer name to “rock 2”.
![47[10] 47[10]](https://cdn.photoshoptutorials.ws/images/stories/78c00660ee68_10D4C/4710.jpg?strip=all&lossy=1&webp=82&avif=82&w=1920&ssl=1)
Scale it small and place over “moss” layer.
![48[10] 48[10]](https://cdn.photoshoptutorials.ws/images/stories/78c00660ee68_10D4C/4810.jpg?strip=all&lossy=1&webp=82&avif=82&w=1920&ssl=1)
Now Add layer mask to the “rock2” and activate brush tool (b) with these settings:
- Brush size: 400px
- Hardness: 0%
- Opacity: 40%
- Flow: 100%
![37a[41] 37a[41]](https://cdn.photoshoptutorials.ws/images/stories/78c00660ee68_10D4C/37a41.jpg?strip=all&lossy=1&webp=82&avif=82&w=1920&ssl=1)
Now paint:
![49[10] 49[10]](https://cdn.photoshoptutorials.ws/images/stories/78c00660ee68_10D4C/4910.jpg?strip=all&lossy=1&webp=82&avif=82&w=1920&ssl=1)
The result should be similar to this:
![50[10] 50[10]](https://cdn.photoshoptutorials.ws/images/stories/78c00660ee68_10D4C/5010.jpg?strip=all&lossy=1&webp=82&avif=82&w=1920&ssl=1)
Now create new curve adjustment layer from the bottom of layers palette. Press Alt+left click in between 2 layer’s (rock2 layer and Curve) to make a mask.
![51[10] 51[10]](https://cdn.photoshoptutorials.ws/images/stories/78c00660ee68_10D4C/5110.jpg?strip=all&lossy=1&webp=82&avif=82&w=1920&ssl=1)
The result should be similar to this:
![52[10] 52[10]](https://cdn.photoshoptutorials.ws/images/stories/78c00660ee68_10D4C/5210.jpg?strip=all&lossy=1&webp=82&avif=82&w=1920&ssl=1)
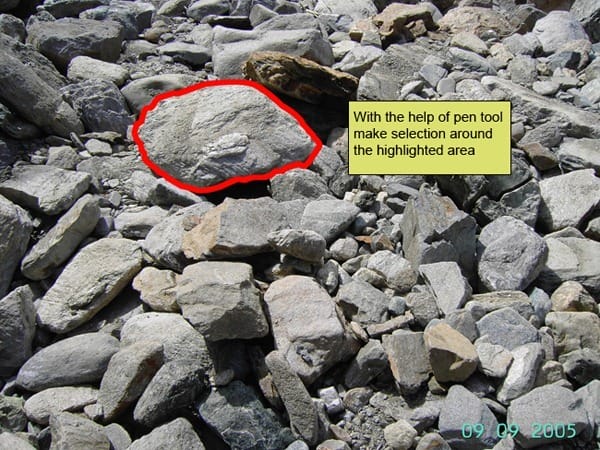
Once again, let’s open the “stones” stock in Photoshop. We will be using the stone from this stock image so we will need to transfer it to our main canvas.
Click the “stones” and press P to activate pen tool and then make a selection around the stone and then click V to activate the Move Tool. Left-click the image and drag the image to the main canvas and change layer name to “rock 3”.

Scale it small and place over “moss” layer.
![54[10] 54[10]](https://cdn.photoshoptutorials.ws/images/stories/78c00660ee68_10D4C/5410.jpg?strip=all&lossy=1&webp=82&avif=82&w=1920&ssl=1)
Now Add layer mask to the “rock3” and activate brush tool (b) with these settings:
- Brush size: 400px
- Hardness: 0%
- Opacity: 40%
- Flow: 100%
![37a[42] 37a[42]](https://cdn.photoshoptutorials.ws/images/stories/78c00660ee68_10D4C/37a42.jpg?strip=all&lossy=1&webp=82&avif=82&w=1920&ssl=1)
Now paint:
![55[10] 55[10]](https://cdn.photoshoptutorials.ws/images/stories/78c00660ee68_10D4C/5510.jpg?strip=all&lossy=1&webp=82&avif=82&w=1920&ssl=1)
Now create new curve adjustment layer from the bottom of layers palette. Press Alt+left click in between 2 layer’s (rock3 layer and Curve) to make a mask.
![56[10] 56[10]](https://cdn.photoshoptutorials.ws/images/stories/78c00660ee68_10D4C/5610.jpg?strip=all&lossy=1&webp=82&avif=82&w=1920&ssl=1)
The result should be similar to this:
![57[10] 57[10]](https://cdn.photoshoptutorials.ws/images/stories/78c00660ee68_10D4C/5710.jpg?strip=all&lossy=1&webp=82&avif=82&w=1920&ssl=1)
Step 8: Add Shadow
Now activate brush tool (soft bush) with these settings
- Brush size: 400px
- Hardness: 0%
- Opacity: 40%
- Flow: 100%
And paint the highlighted area.
![58[10] 58[10]](https://cdn.photoshoptutorials.ws/images/stories/78c00660ee68_10D4C/5810.jpg?strip=all&lossy=1&webp=82&avif=82&w=1920&ssl=1)
The result should be similar to this:
![59[10] 59[10]](https://cdn.photoshoptutorials.ws/images/stories/78c00660ee68_10D4C/5910.jpg?strip=all&lossy=1&webp=82&avif=82&w=1920&ssl=1)
Once again, let’s open the “stones” stock in Photoshop. We will be using the stone from this stock image so we will need to transfer it to our main canvas.
8 responses to “Create a Surreal Scene with a Cool Snail that Flies”
-
Half the links don’t work.
-
What a shitty tutorial. No mention of why any of the steps are done. Just bullshit “input these values”. Thanks for nothing asshole.
-
Nice and useful! Well done, thank you.
-
Sorry , I was thinking in Greek … i meant helpful …
-
-
There are broken links in photos( and there is no PSD file of the tutorial( can you, please, add?
-
Hello,
there are some broken links, can u fix please?! -
theres a couple of broken links :(
-
good job,thanks.


Leave a Reply